
Getting started with Good2Go!
Following are some short tutorials that will help you get up and running with Good2Go in no time.
1. Get your account.
Every new user account starts with a 14-day free trial period. No credit card required, cancel anytime.
2. How-to send a proof.
Click on the icon above to watch two very short video tutorials on how to send your first proof with Good2Go.
3. Schedule training.
Schedule your personal set-up and training session. Takes about 15-30 mins and we’ll make sure you’re Good2Go!
Set-up your branding
Setting up your Good2Go environment with your company information and system preferences will provide a better user experience for you and your clients. This process should take about 10 minutes.
1. Resize your company logo to maximum of 560 (width) x 120 (height). Save as a PNG and make sure it’s under 1MB in size.
2. In Good2Go open the Account page under your user name (upper right).
3. Scroll down to the “Team” section and enter your company name as the team name.
Example: Progressive Print
4. Click on the button for “Company Logo and Website“.
5. Drag and drop your resized logo on the import target.
6. Fill out the other company information. Email, web site and customer service email.
59 second video walkthrough on how to set up your branding in Good2Go.
How the branding is applied in Good2Go.
1. The company logo and name are used in the layout of the email sent to the customer.
2. The logo is used on the review page and other customer pages to reenforce the branding.
3. The account holder name and email is used to personalize the contact information.
4. The email header is formatted to show the company name, action and a summary of the email so the user knows who’s the email from.
Set-up your preferences.
Setting up your preferences will help save you time in many ways! See below for how to set up the most important settings.
1. In Good2Go open the Settings page under your user name (upper right).
2. Select the Edit button in the upper right corner.
3. Make selections for your desired unit of measure, and date format.
4. Set-up your default deadline. The deadline is used by the automatic reminders to help remind customers of important deadlines.
5. Default review message. This is the default message used when sending out a document for print approval. This message can be changed on a case-by-case basis.
Sample message:
Click on the “Review now!” button to review and approve your layout for print. Approval is required before we can produce your job. Please contact us if you have any questions.
6. SAVE YOUR CHANGES! At this point, be sure to save your changes for the settings made so far.
7. Set Auto Reminders. These are relative to the deadline/due date defined for any specific job. Once a customer reviews a file, no more reminders will be sent out.
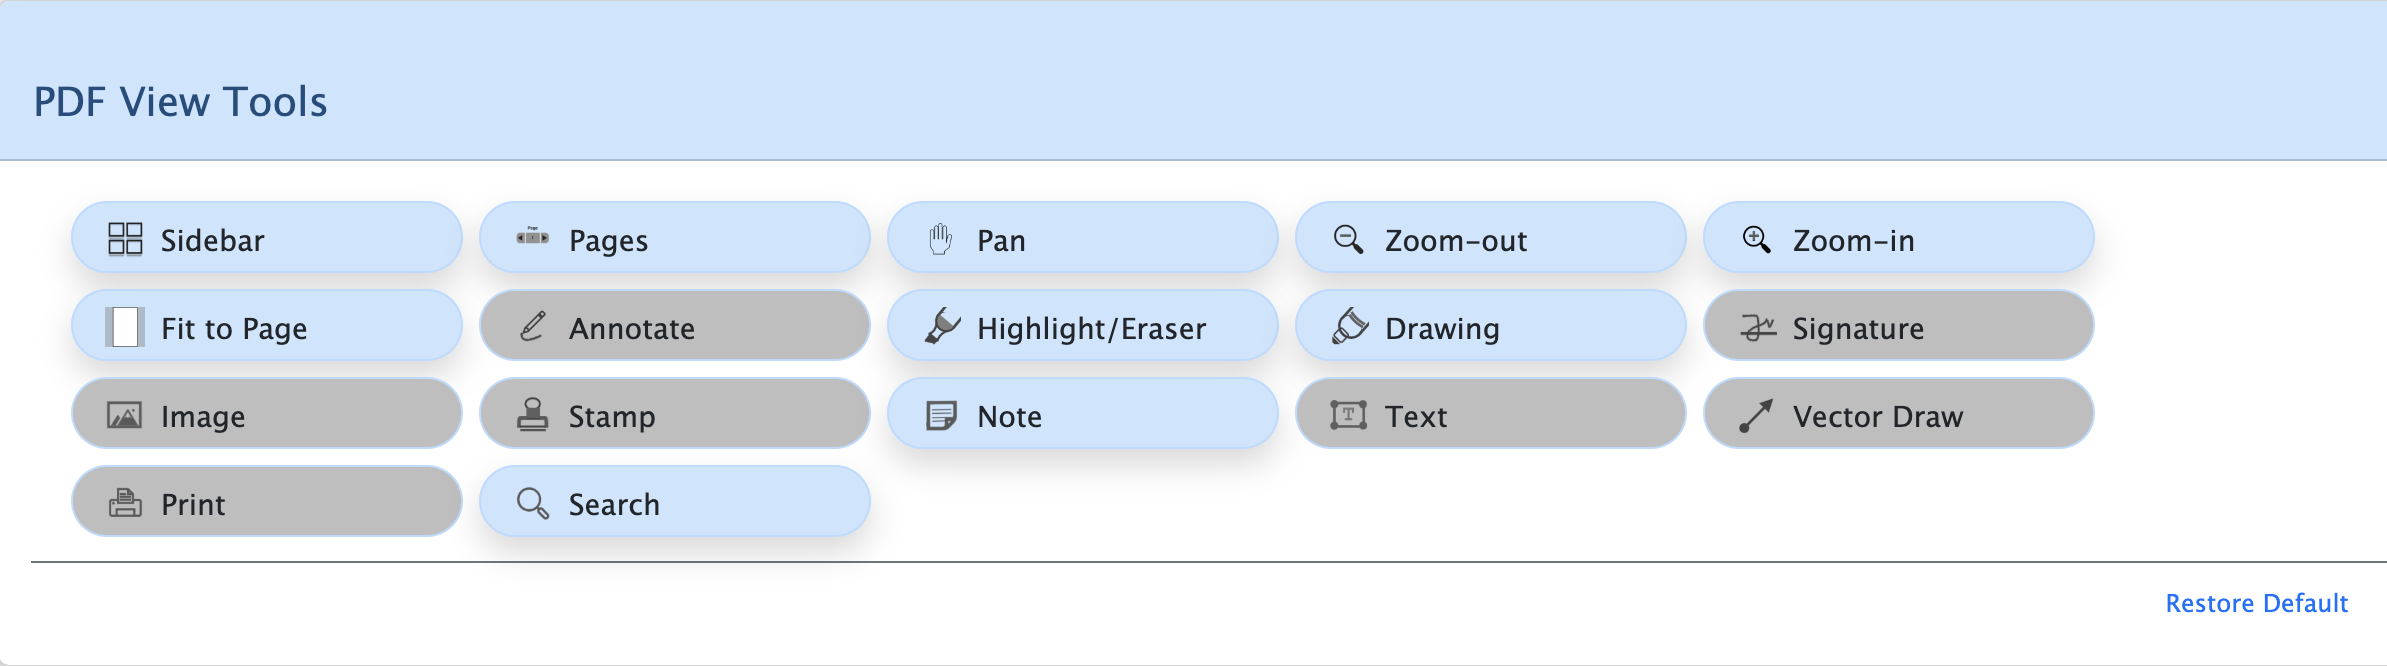
PDF Annotation Tools
Items in blue will be shown to document reviewers. Review the screen shot below to see our recommendations for review tools.
4 minute video walkthrough on how to set up your important preferences in Good2Go.
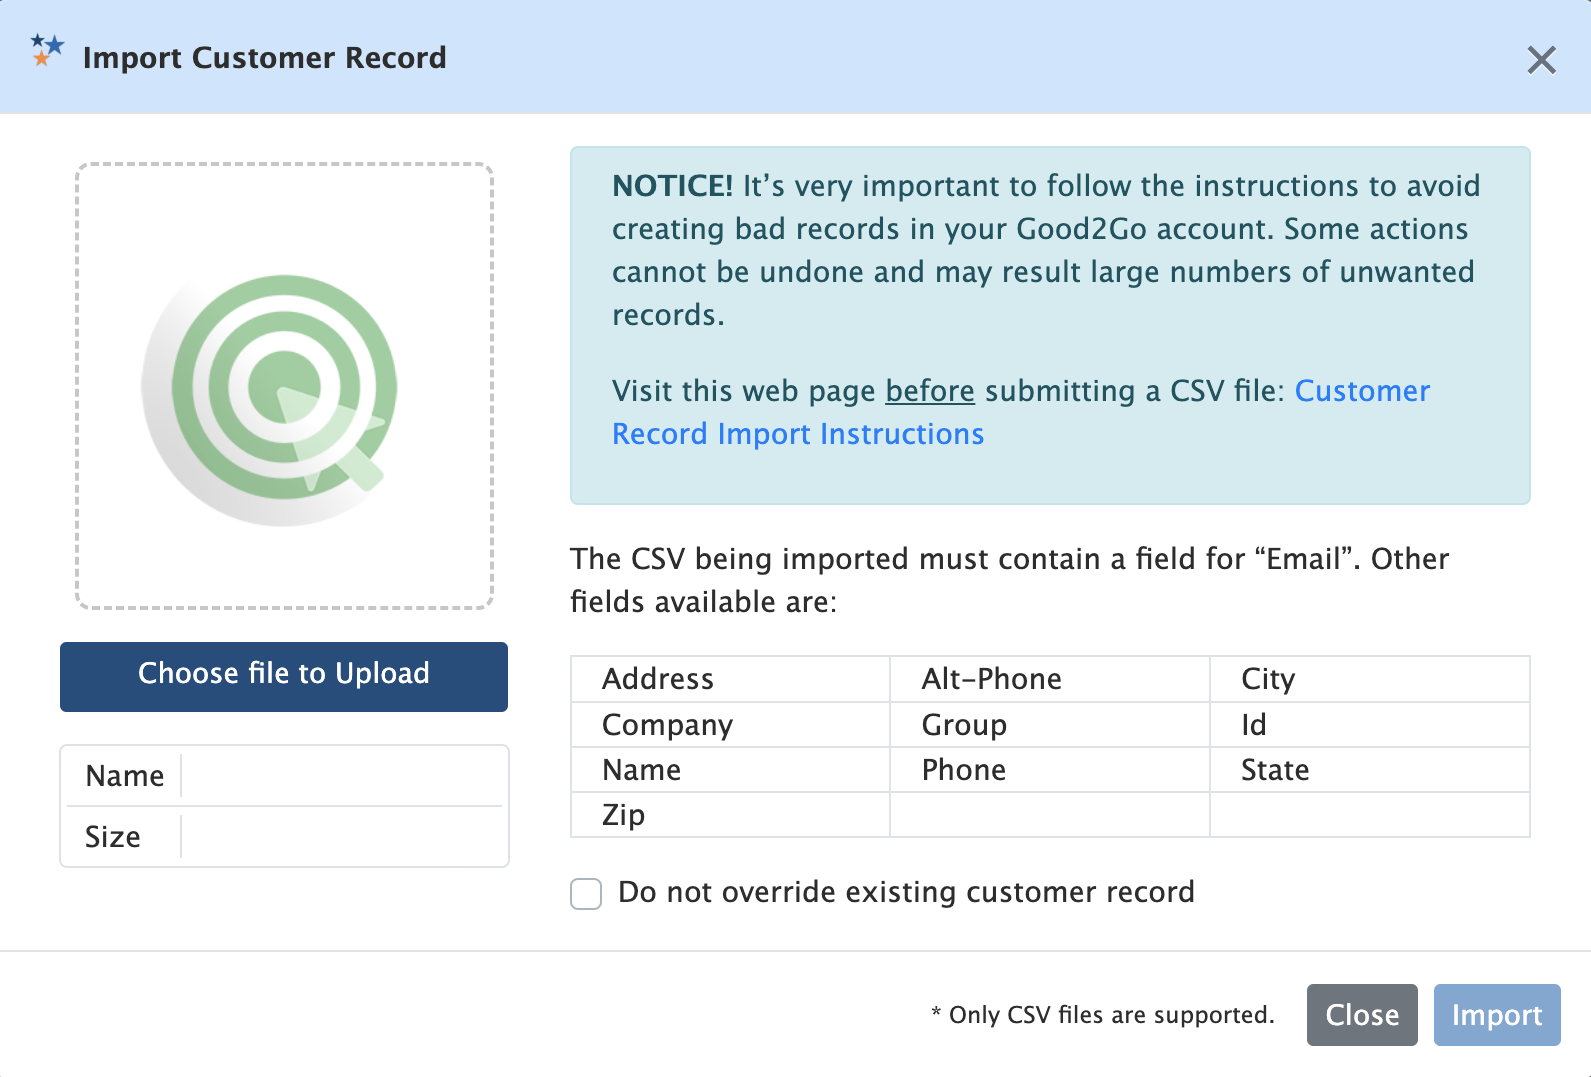
Import your customer database
Learn how to import your customer database (CSV) into Good2Go. This will save time entering customer data.
Good2Go Interface Roadmap
The three primary views in Good2Go and what their primary purpose is.
Click on an image to learn more about that view.
Desktop
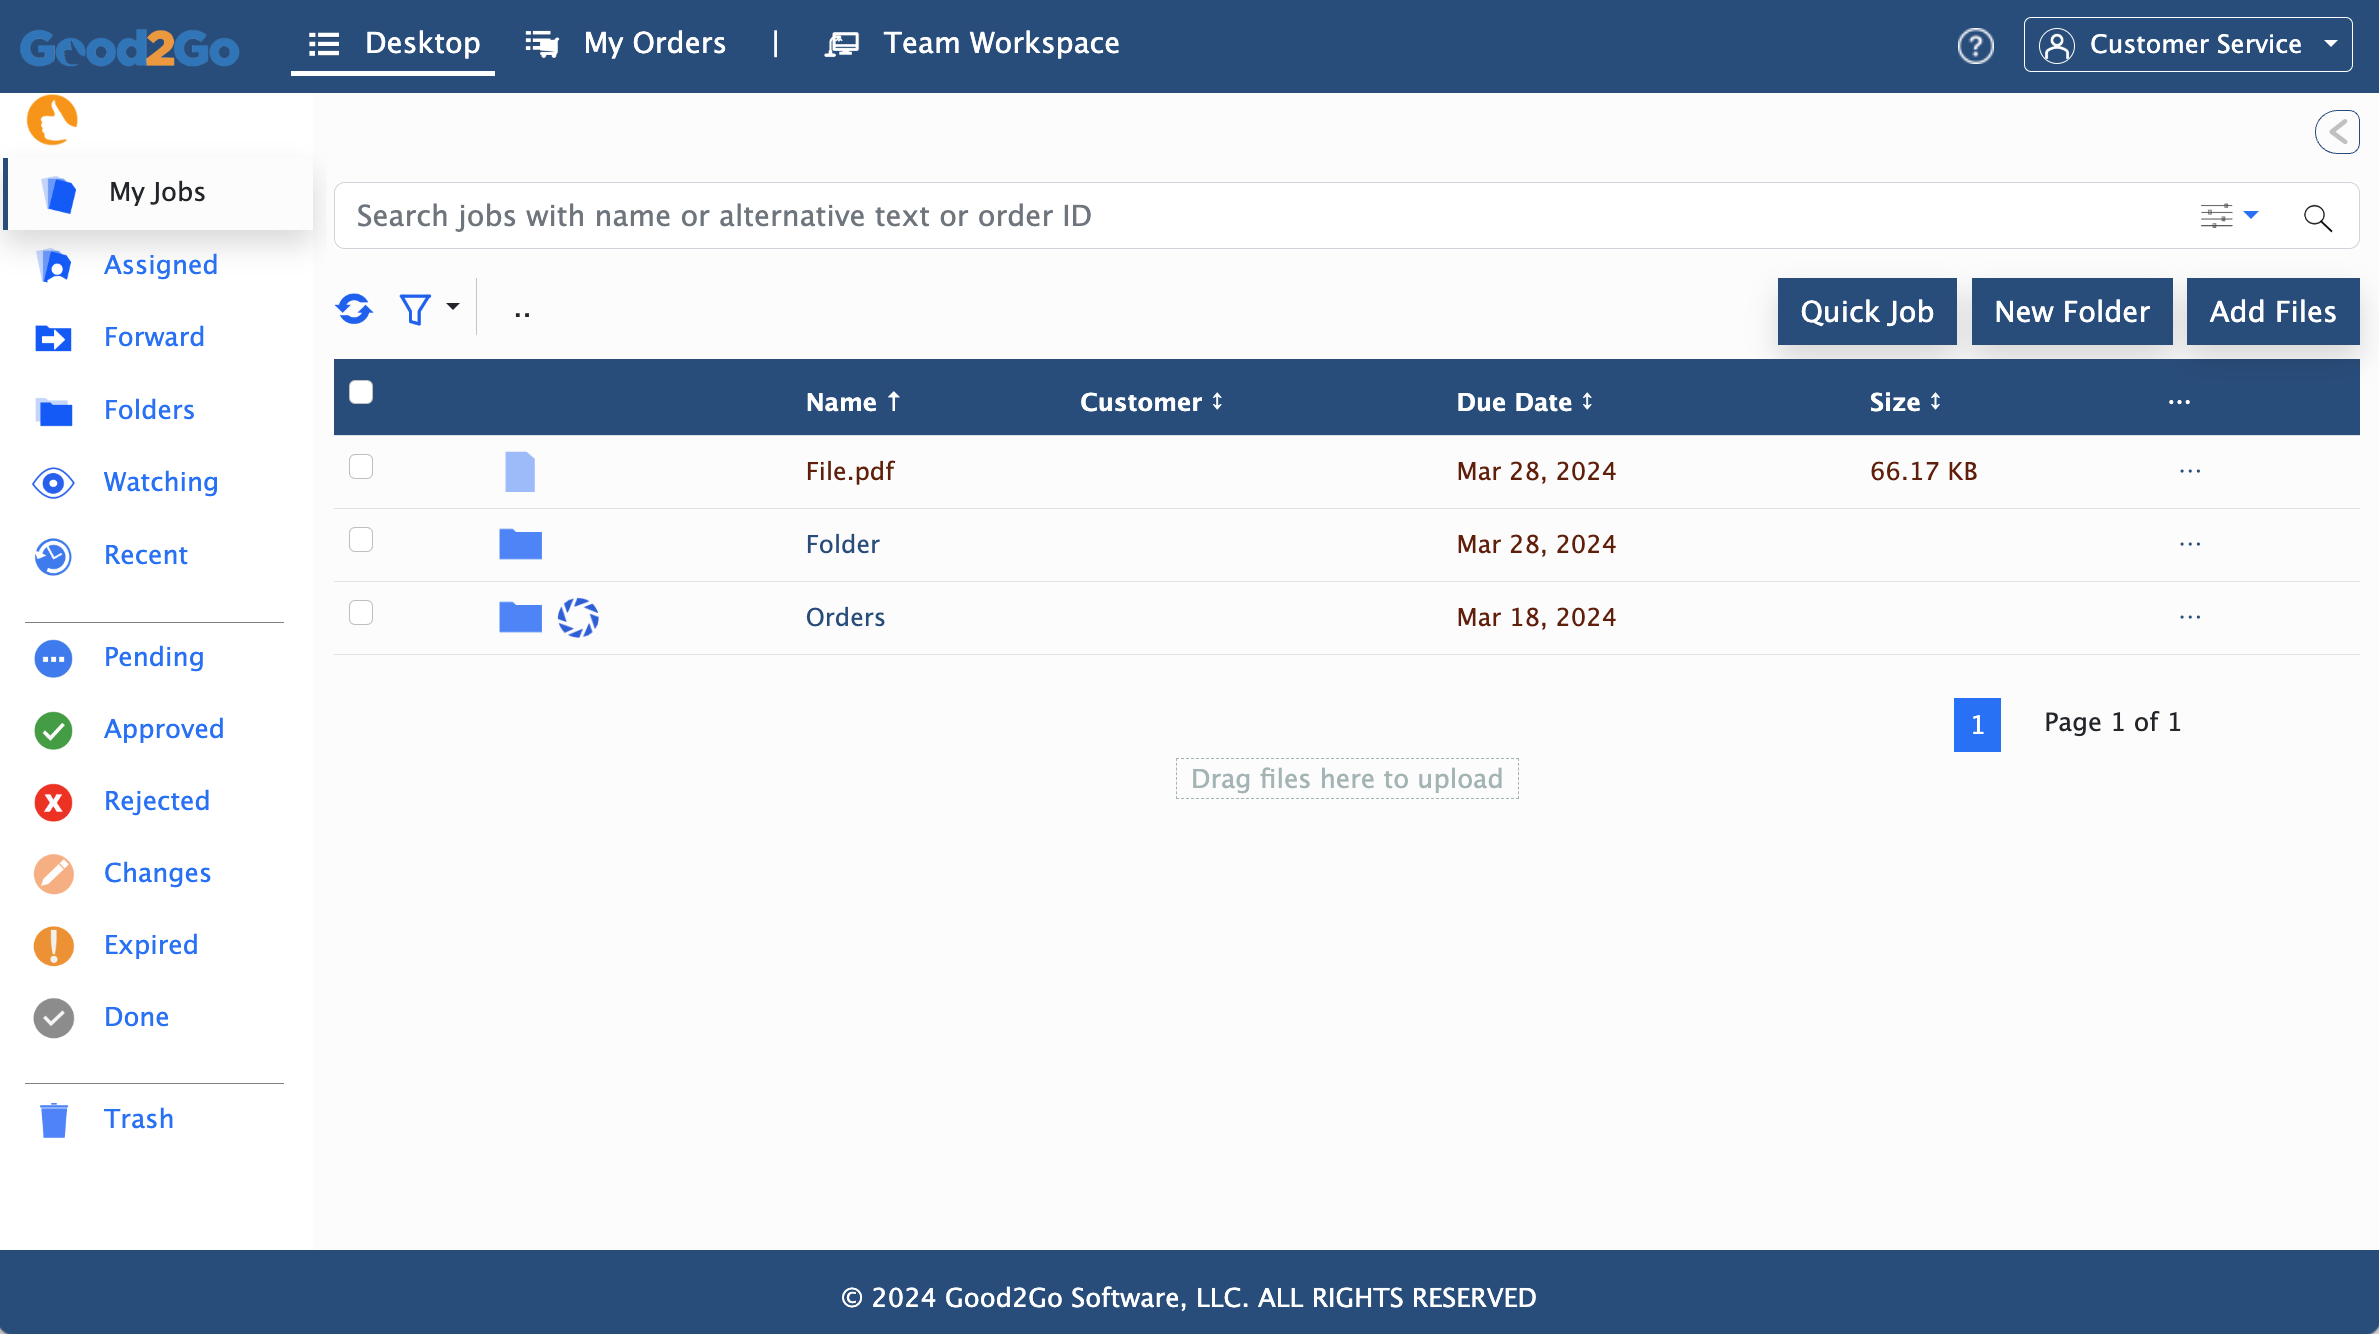
The place to organize your files and jobs in your account.
My Orders
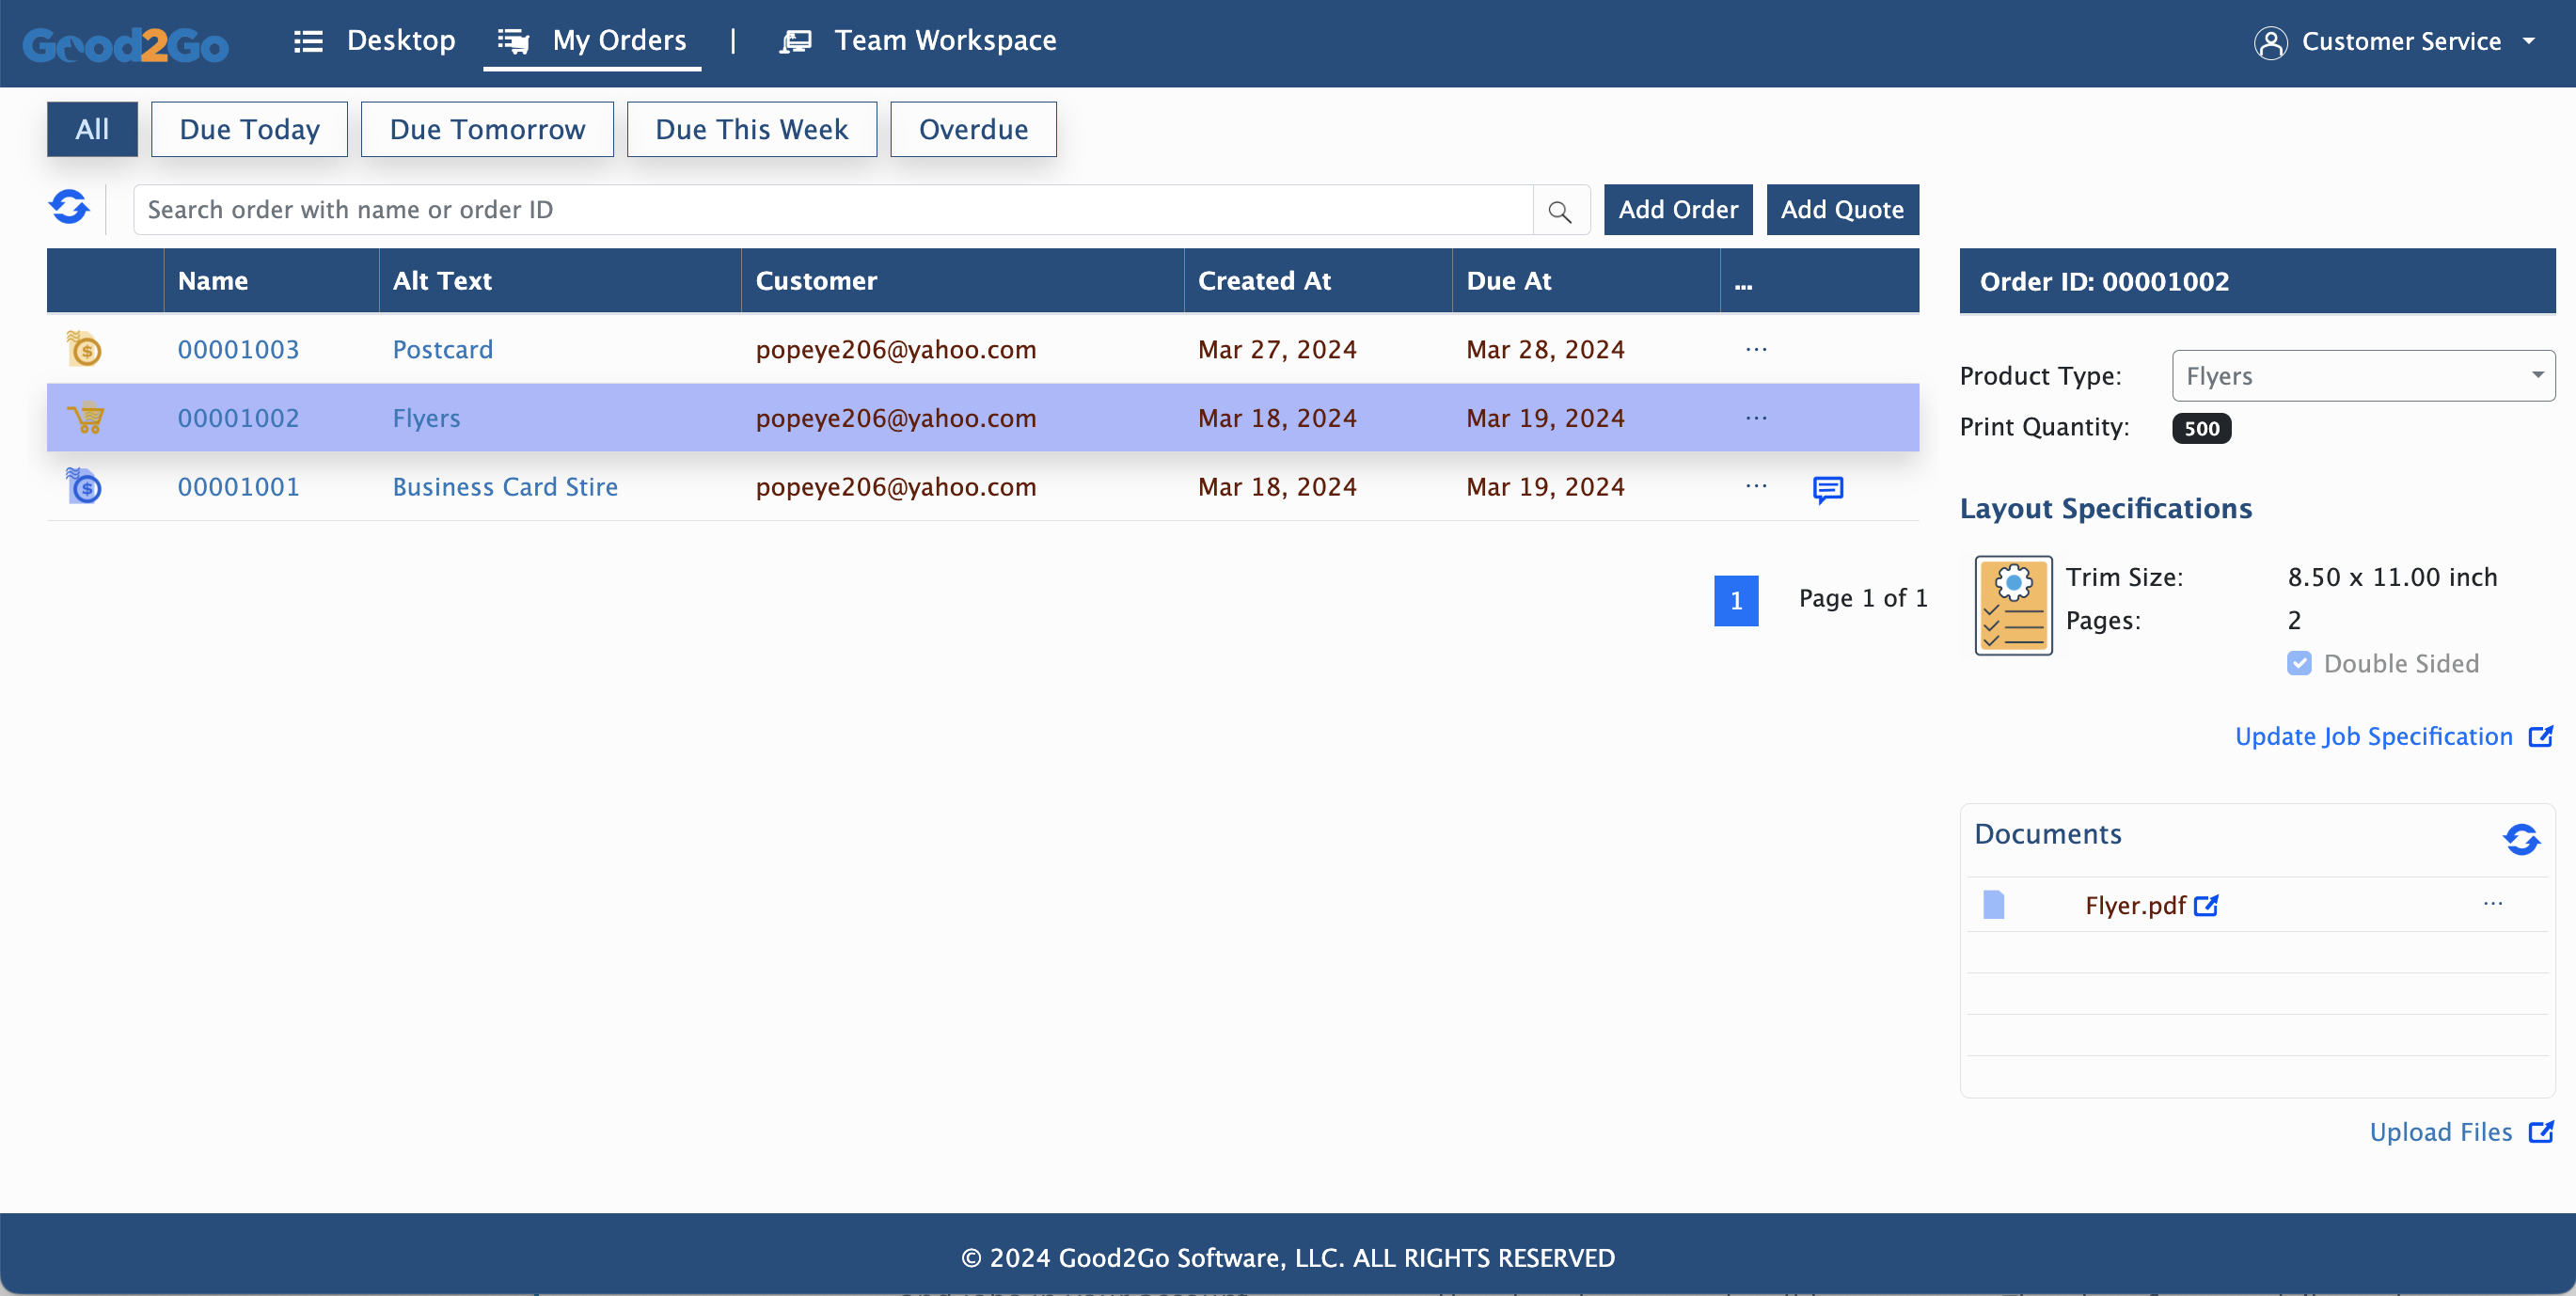
The place to view orders/files submitted to any upload portals in your account.
Team Workspace
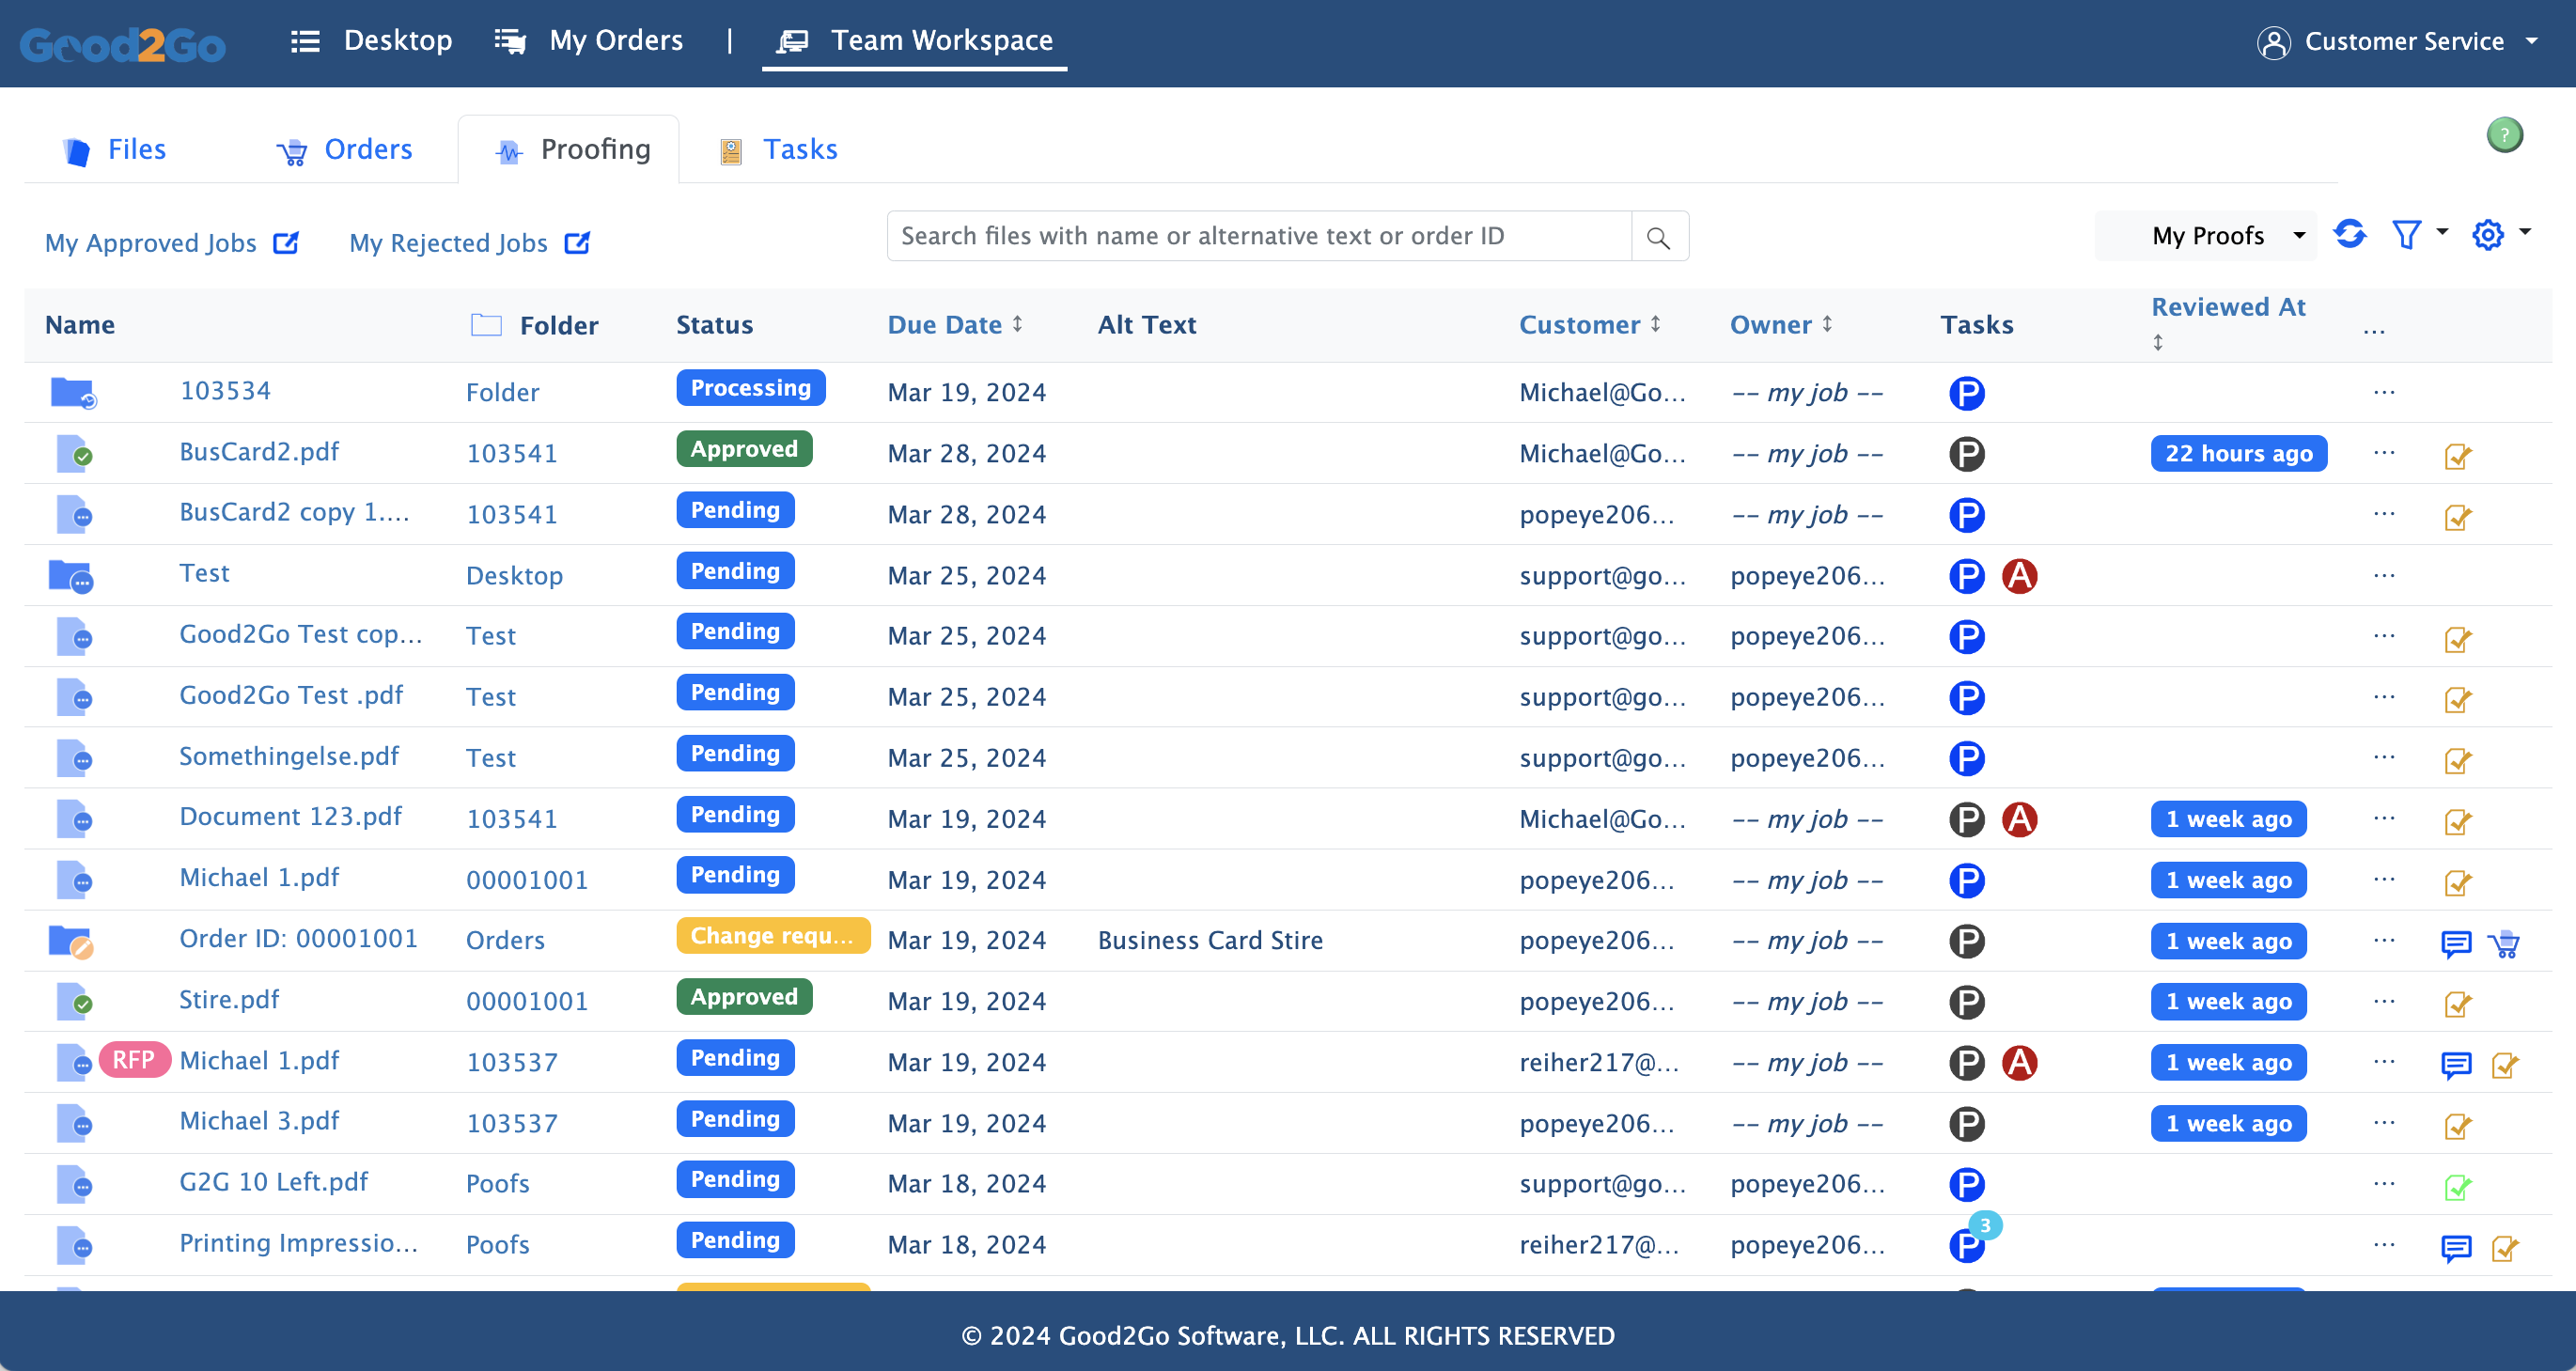
The place to manage your daily work and collaborate with other employees.
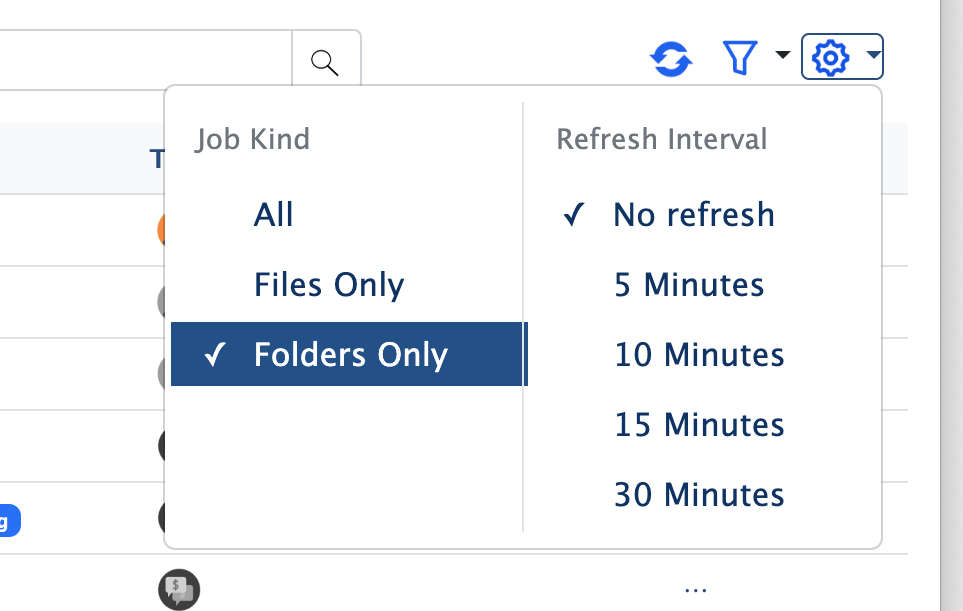
Good2Go Icon Key
Guide to different symbols used in Good2Go
Jump to a specific view.

Access file or folder menu.

View last customer comment.

Refresh current view.

Folder is defined as a order portal

Custom label badge (varies)
Document information icons. Shown in the right-hand panel when a document is selected.

Lock/Unlock

Document preview screen

Document information screen

Document reminders screen

Document history screen

Document preflight screen
Good2Go Tutorials
The following lessons assume you have set up your branding, and Good2Go preferences.
Online Proofing Tutorials
Send a document for review.
For the above to work, be sure to have your default settings defined for the default due date and the default review message. Also, be sure to define your reminders so that the client is reminded if they don’t respond.
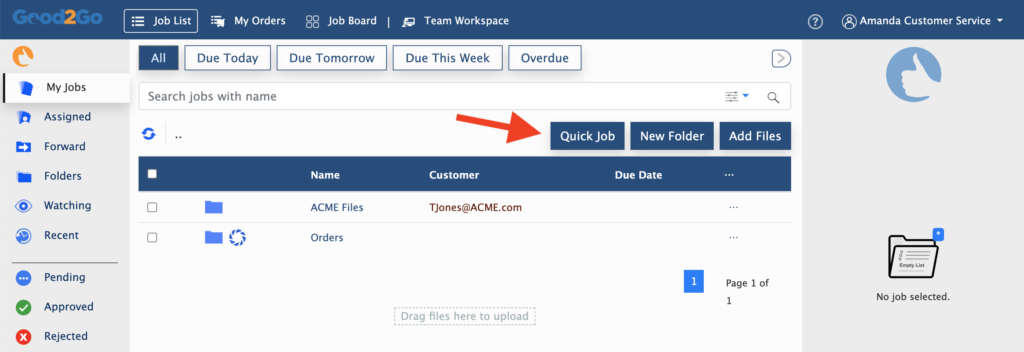
Quick Job is accessed from the main “Job List” view.
Quick Job Interface.
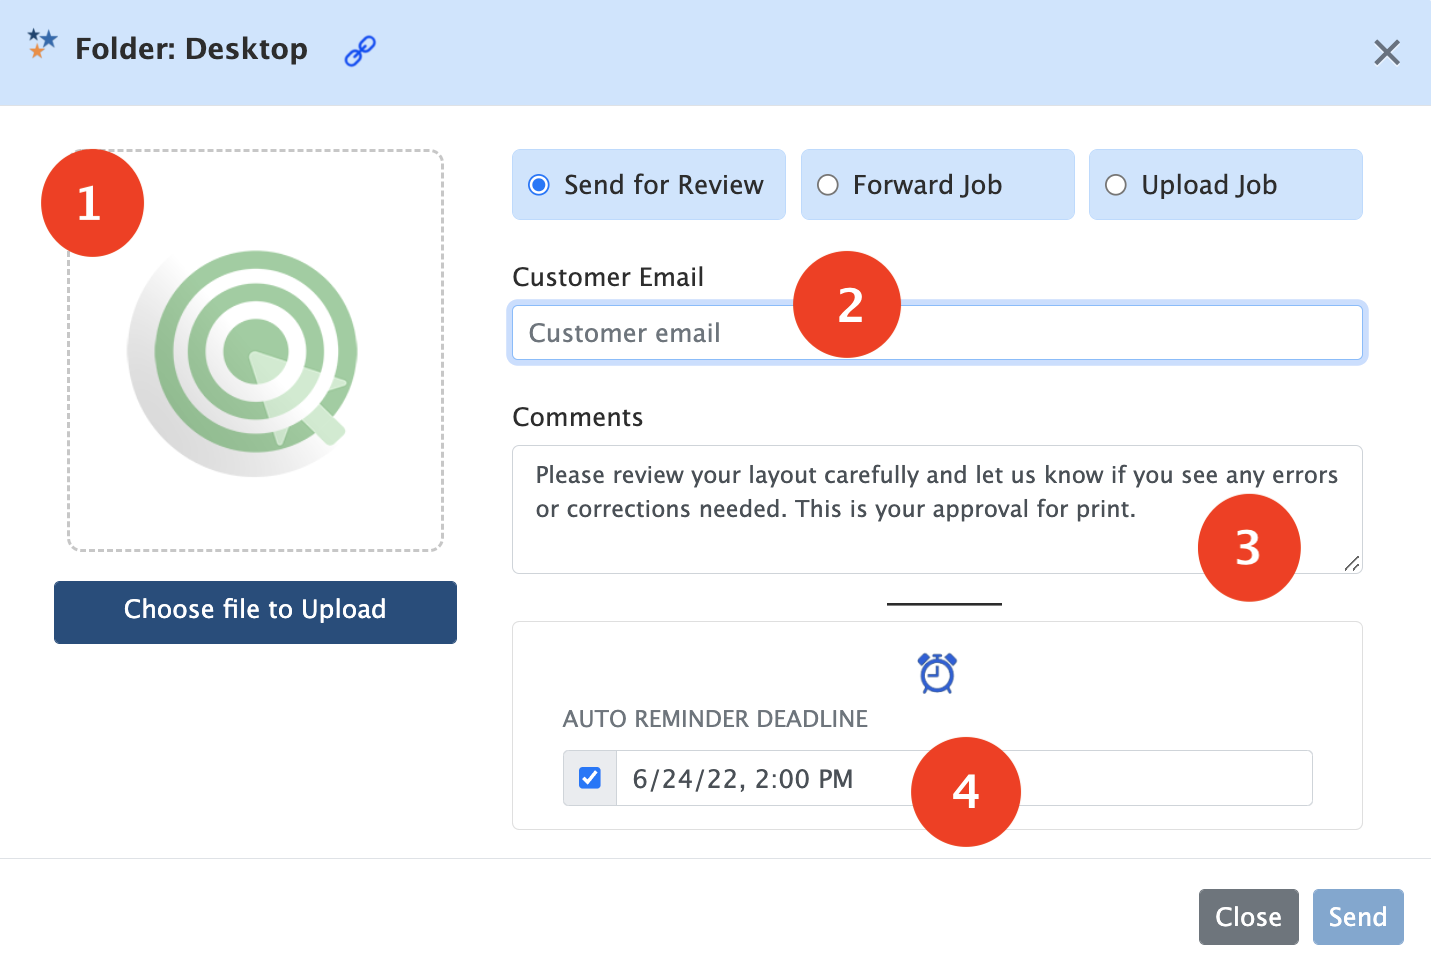
1. Drop area for the document to be sent.
2. Email entry box.
3. Review message. Auto-fills with the default image.
4. Default deadline automatically filled in.
Watch the short <2Min video on how the Quick Job feature works.
Shortcut!
Move your cursor to the right of the folder name to show the link shortcut to the HTML version of the Quick Job window. This URL can be bookmarked for quick access at any time.

Other places to send a review.
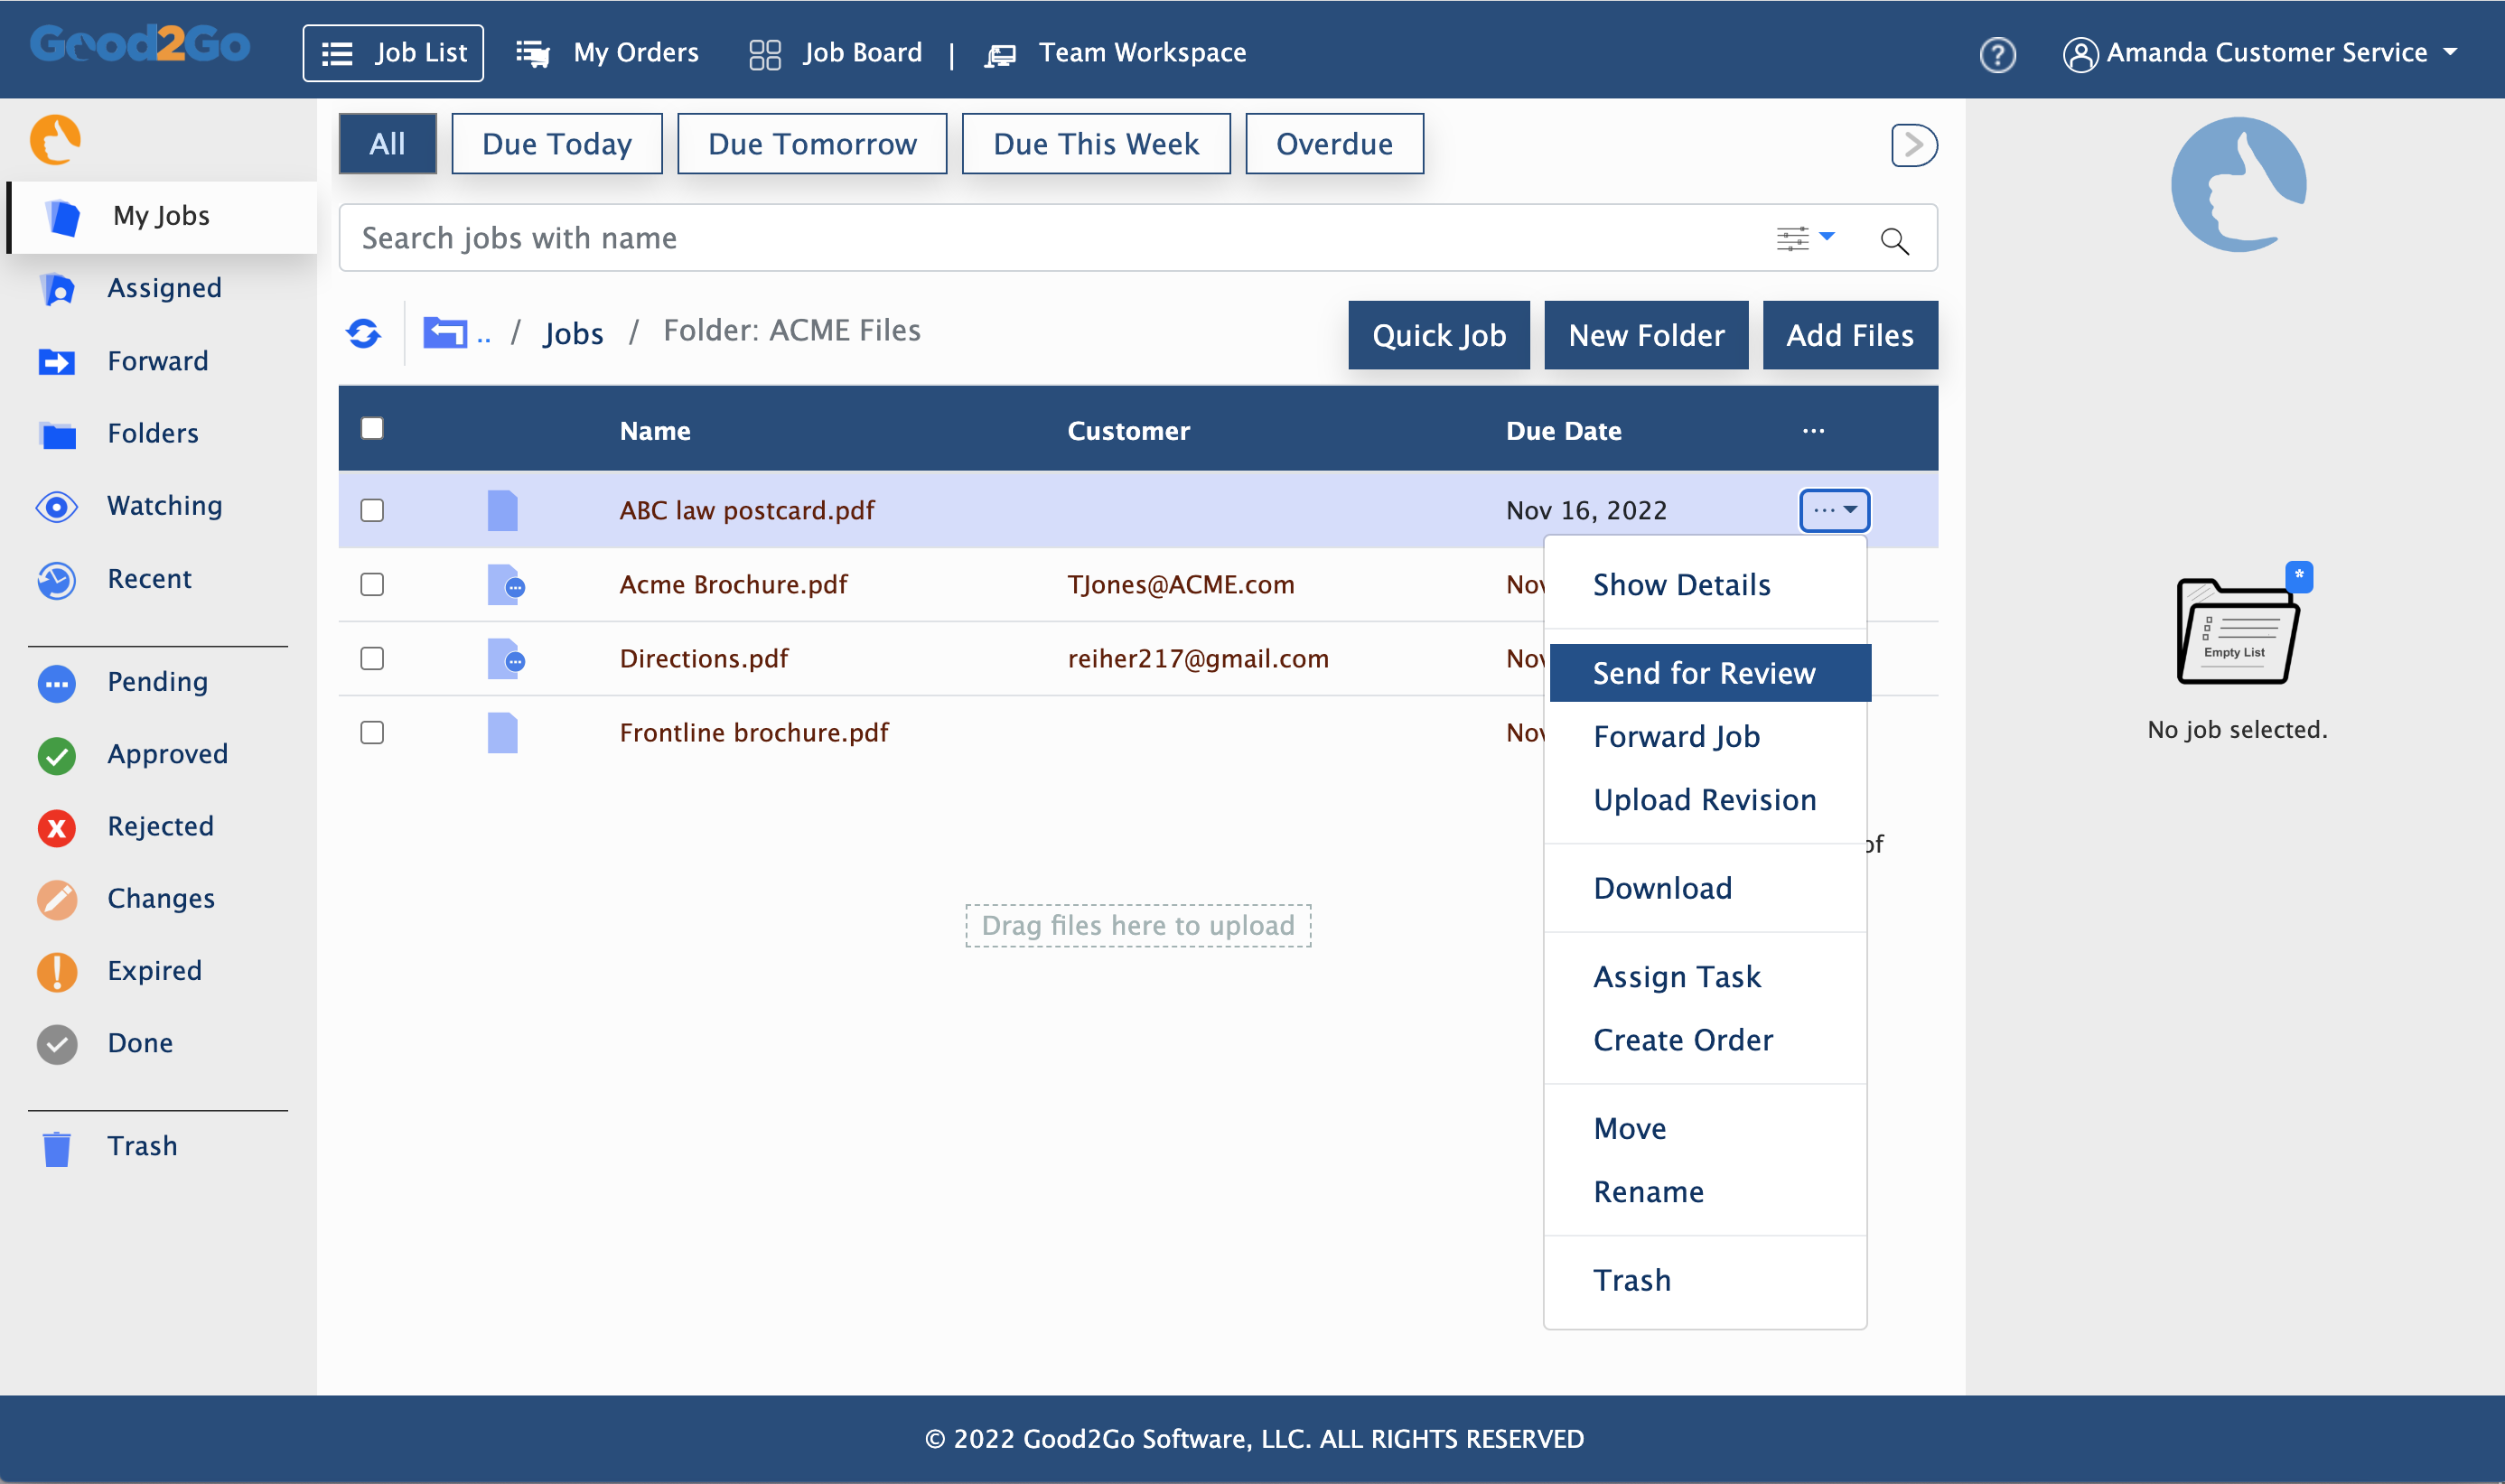
From the context menu
Click on the context menu for a file and click on “Send for Review”. Note, Team Workspaces do not have file actions in the context menu.
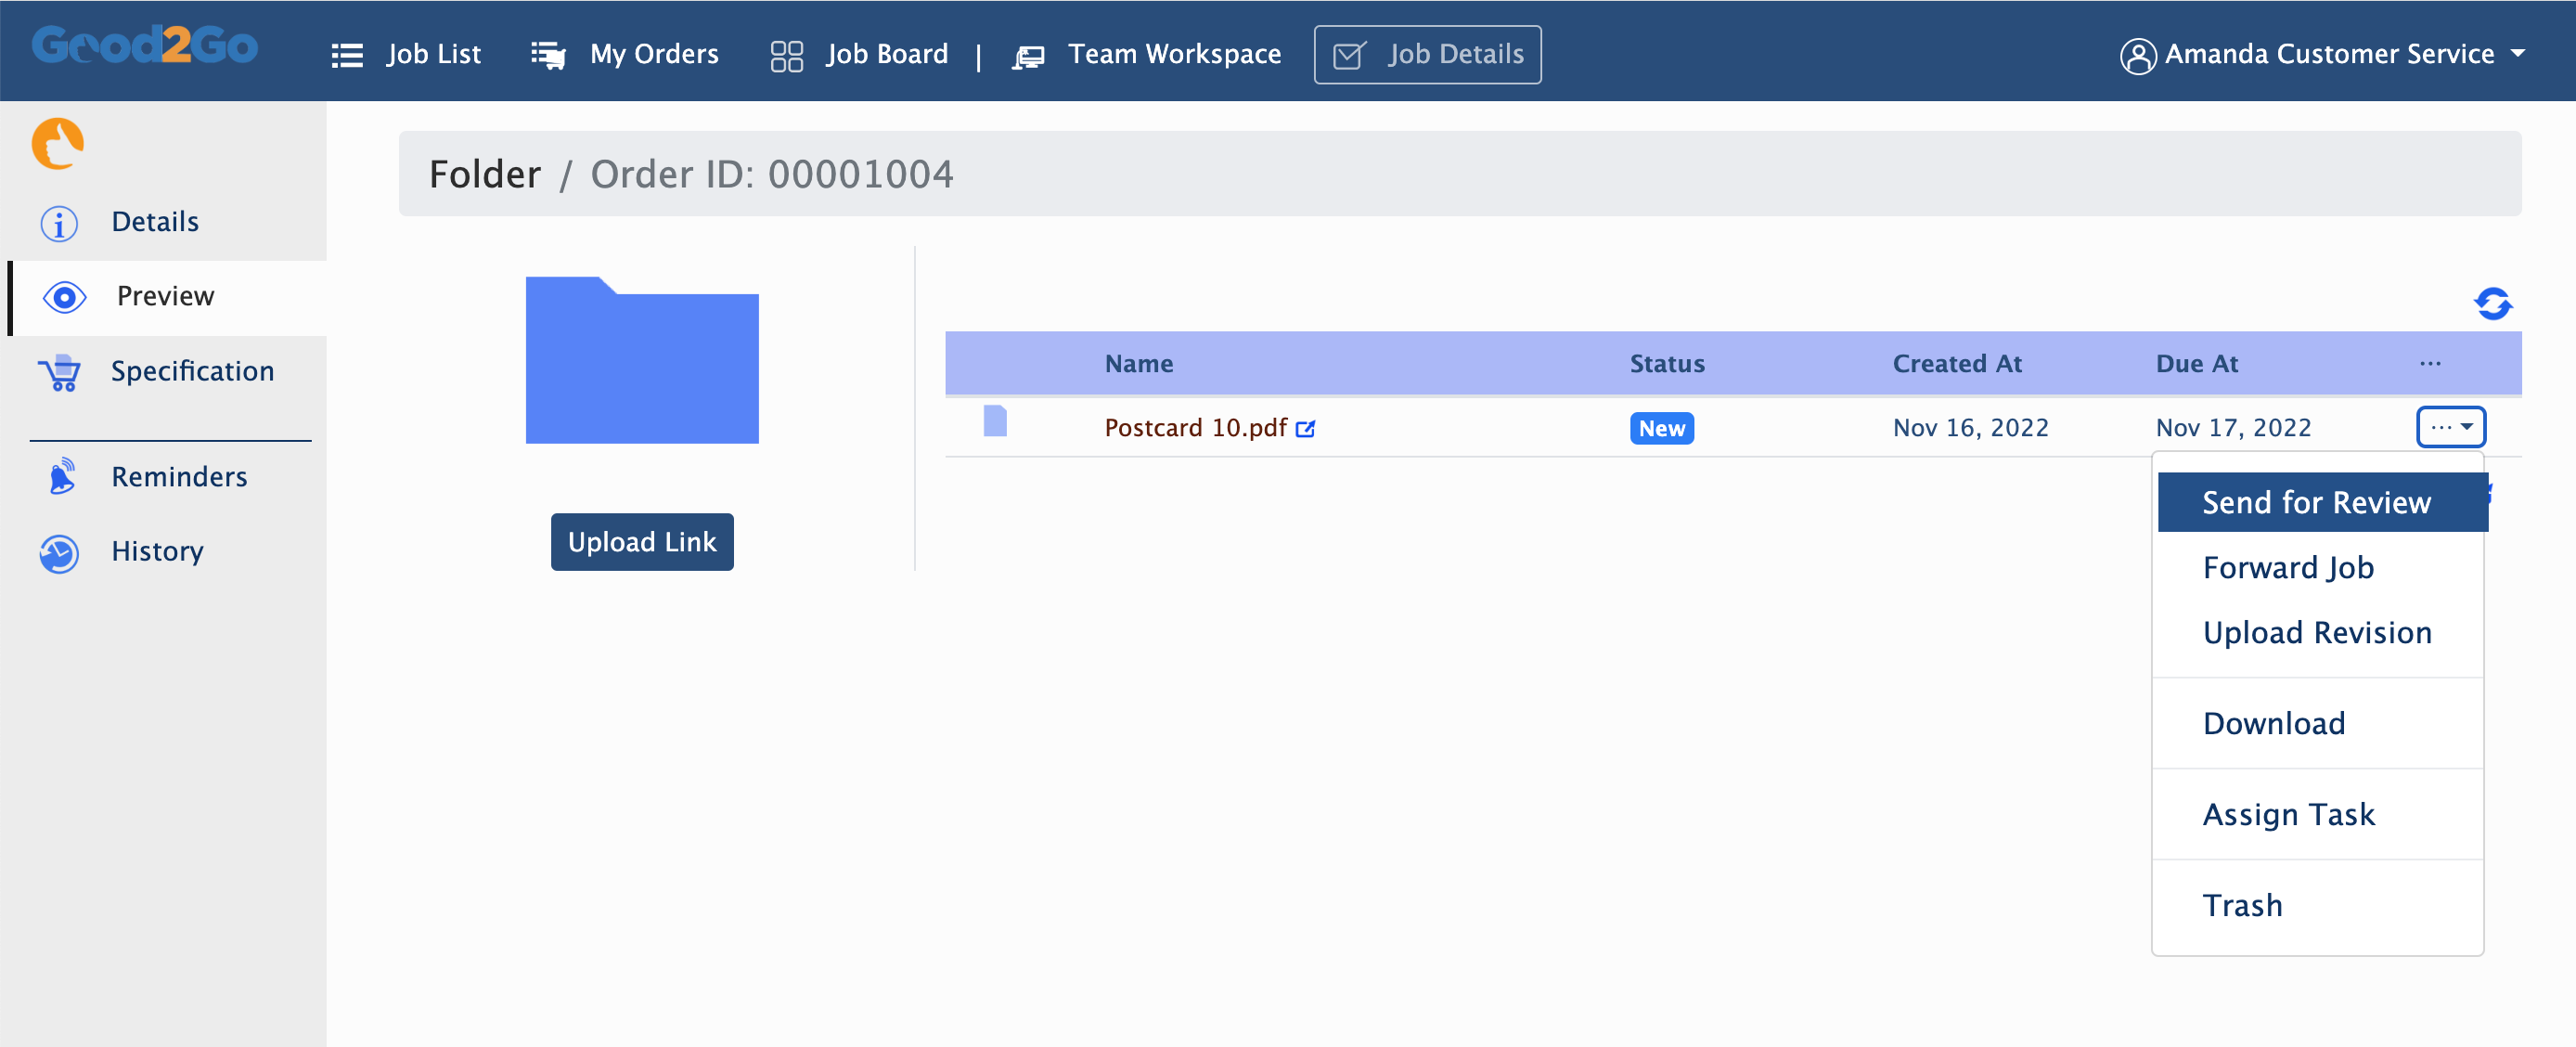
From a quote or order screen
Open a quote or order from the “Orders” screen by double clicking on the order number. From the “Specification” screen navigate to the “Preview” window and click on the context menu for the file to be sent out for review.
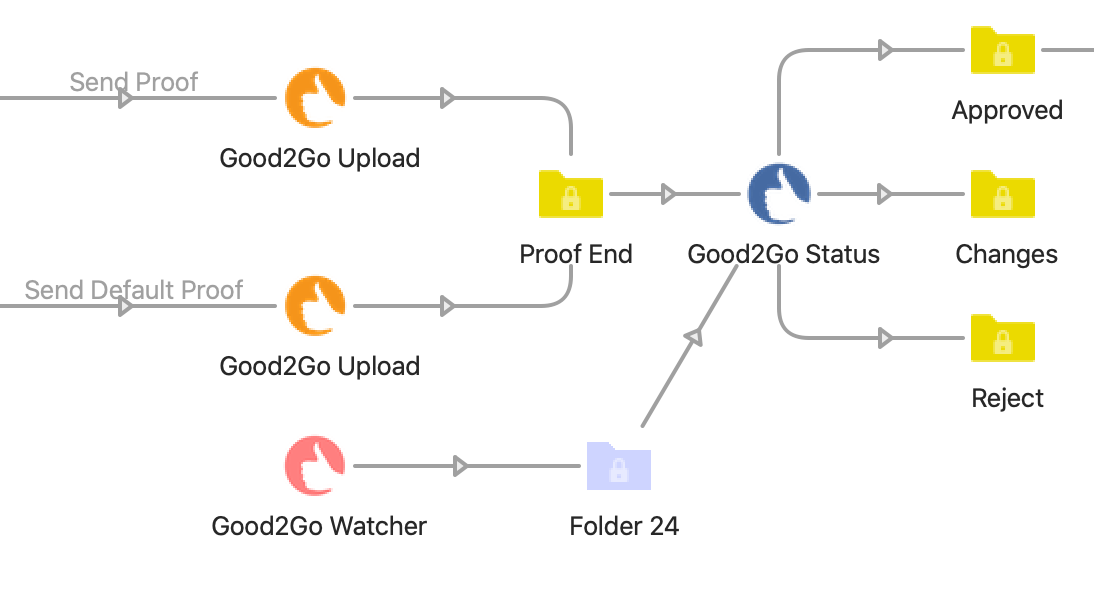
From Enfocus Switch
With the Good2Go Apps for Enfocus Switch, documents can be routed to a Good2Go account for customer review with standard or custom messages. Book a meeting with us to learn more about how to set up the Apps.
Multiple file (folder) review
Like a single document review, you can send multiple files at once for review and approval. Just put the files in a folder, then select “Send for Review” from the folder action menu. the client will Get nicely formatted summary screen and access to the multiple document review wizard.
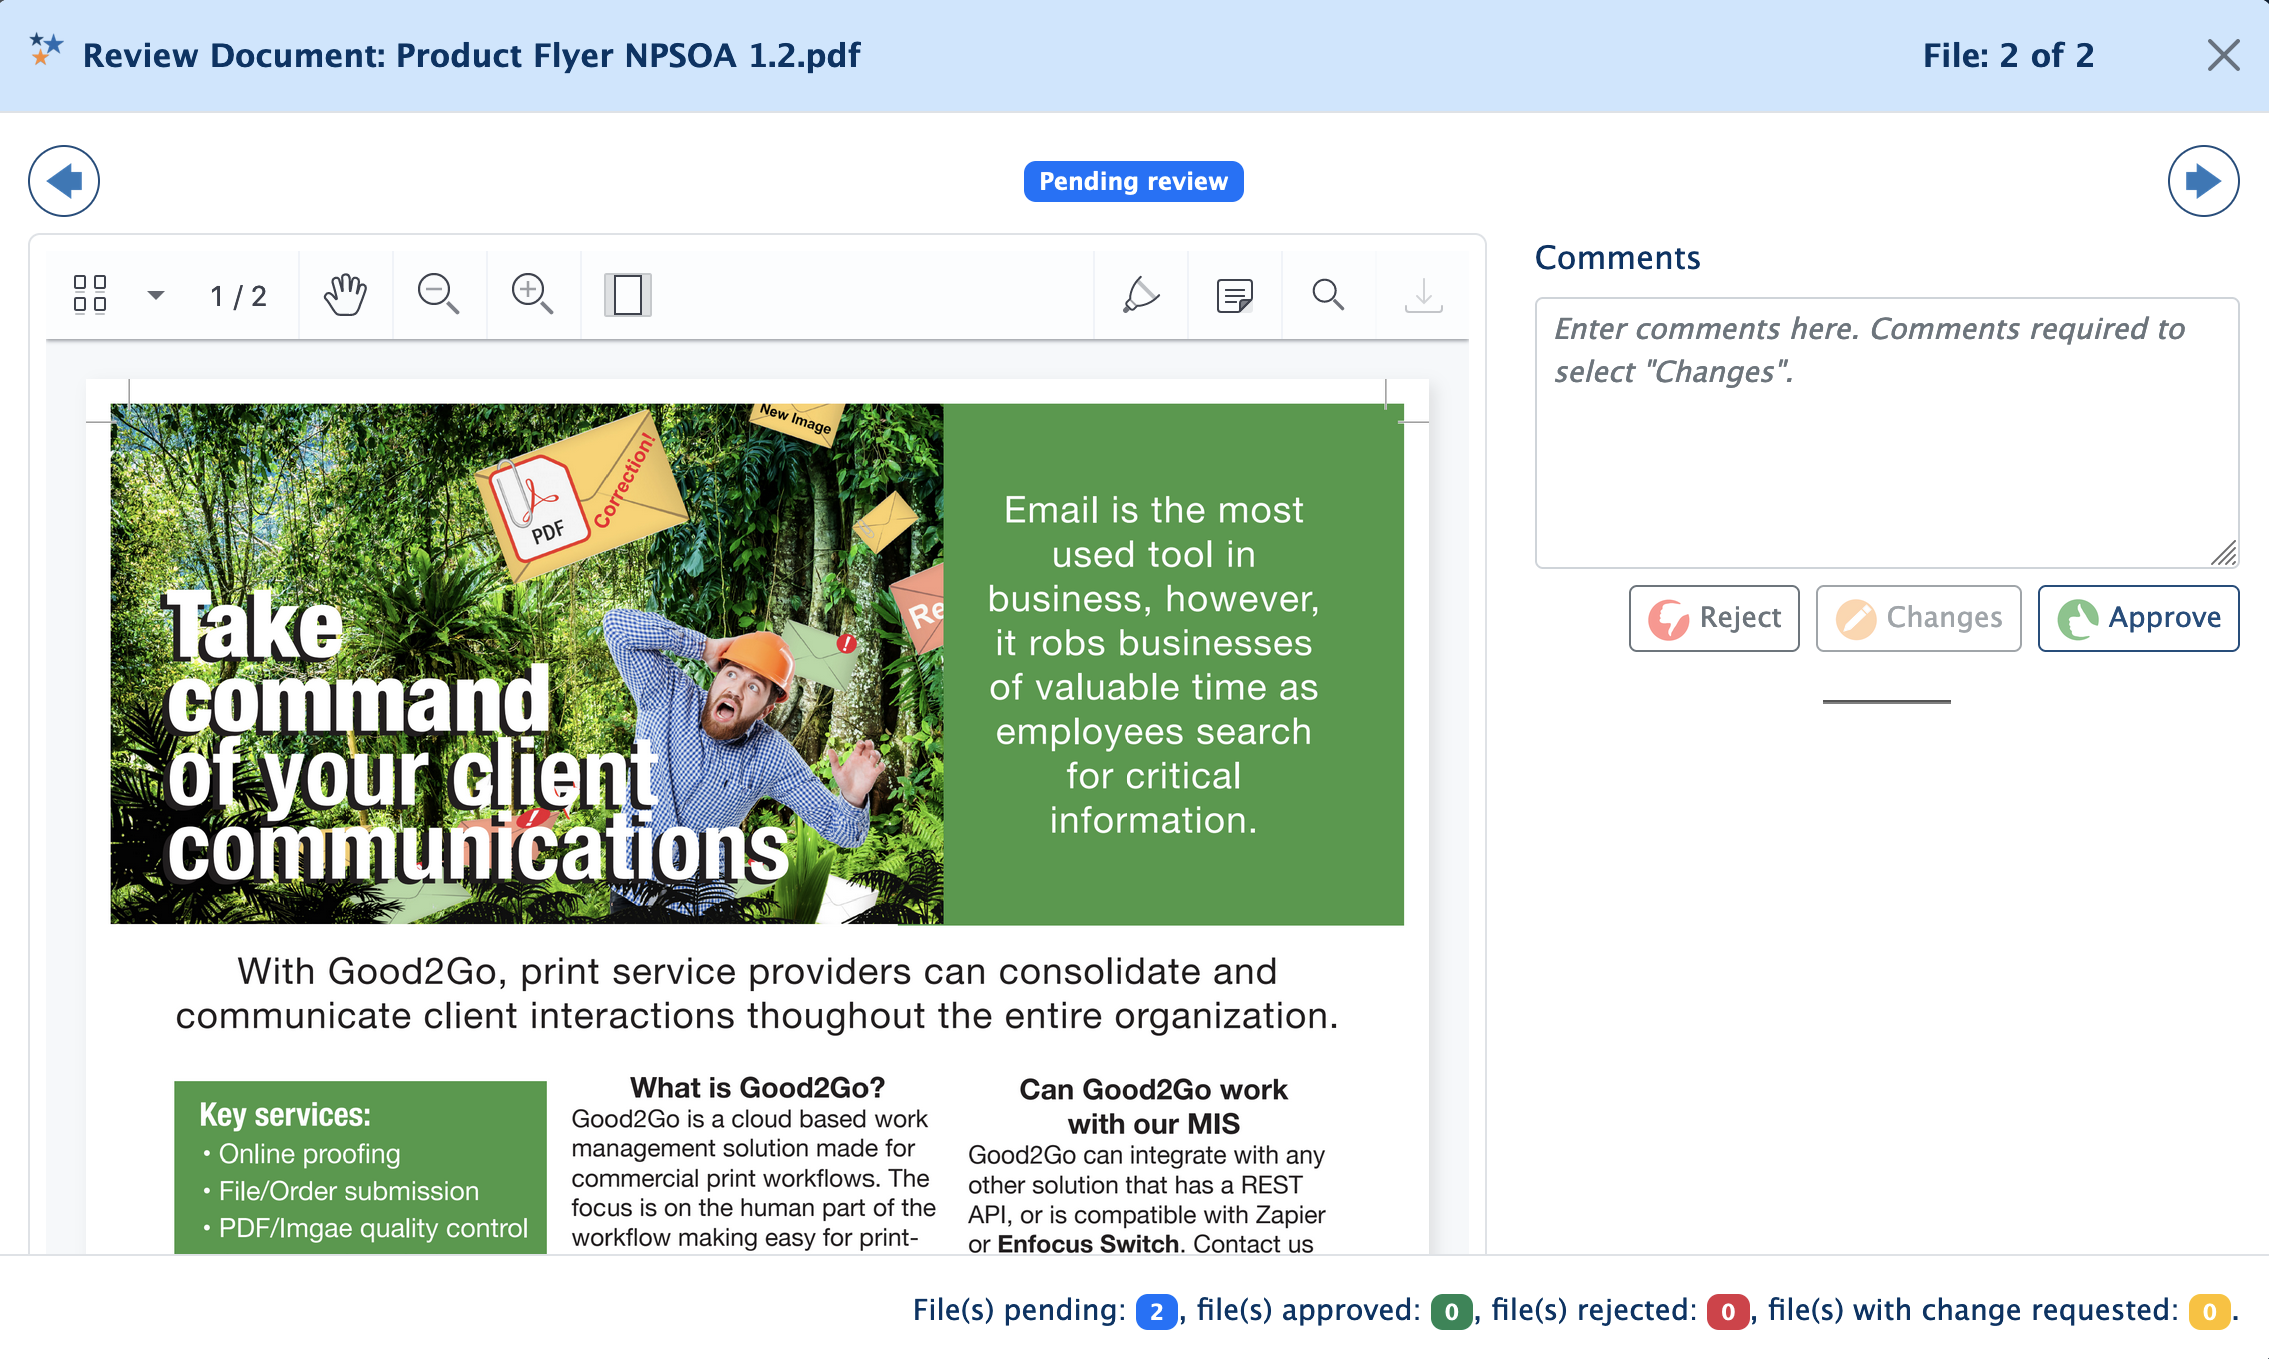
The review wizard moves the client through the review process for each file.
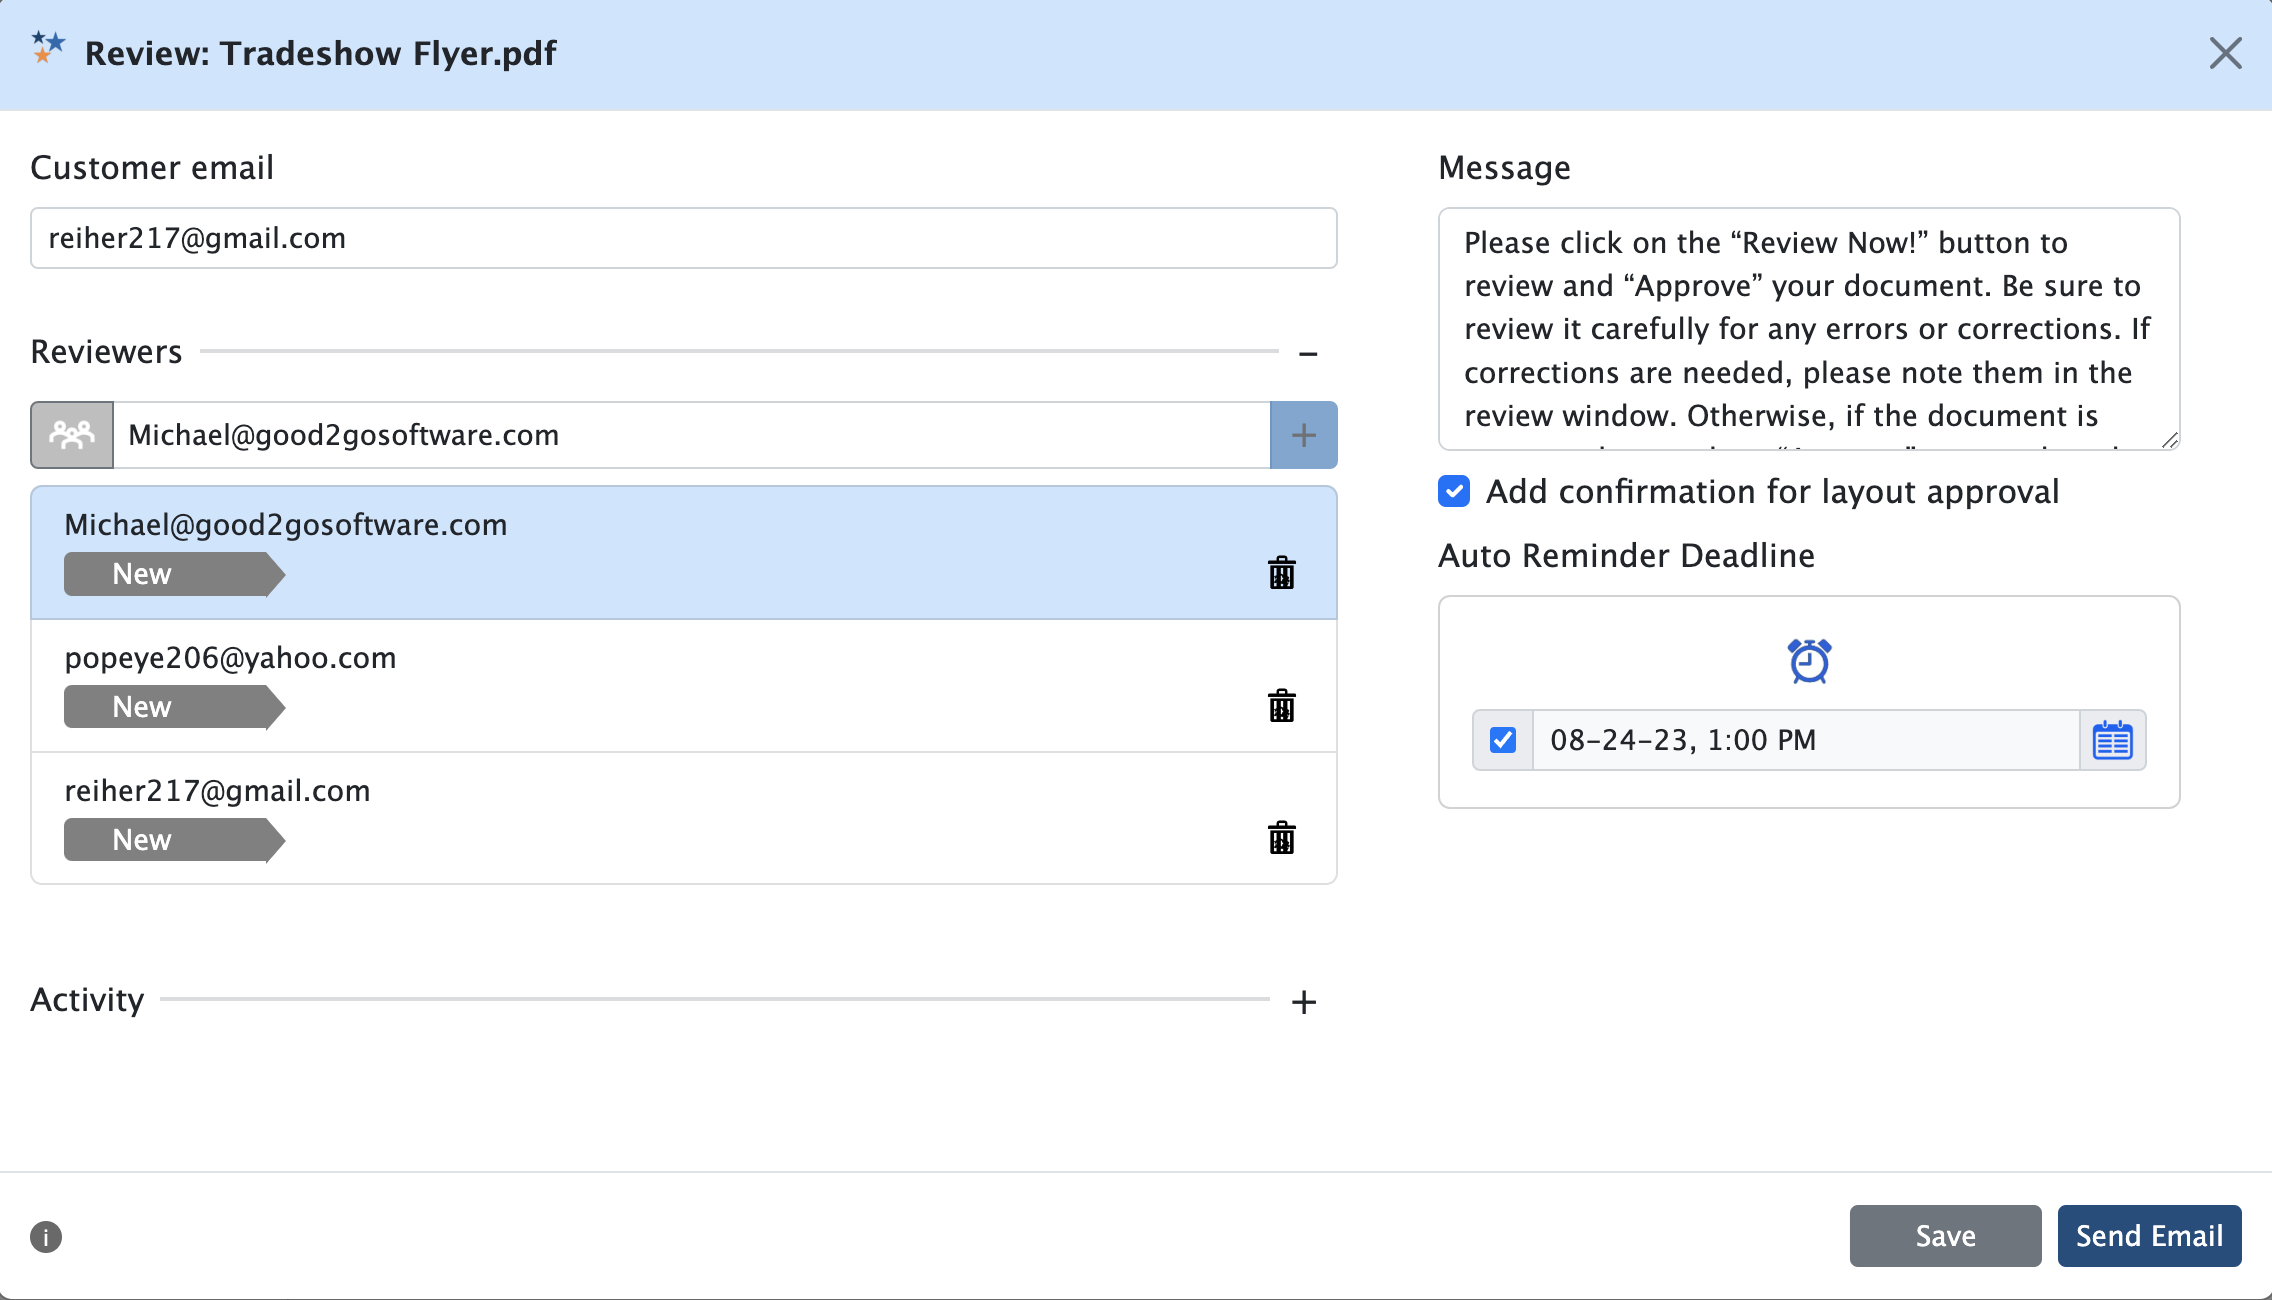
Multiple Reviewers
From the context menu for a file or folder, select “Send a Review”. In the “Send a Review” dialog, enter the primary clients email. Then select the “+” button to add more reviewers. Up to 10 per-review. Note that each reviewer will be tracked individually.
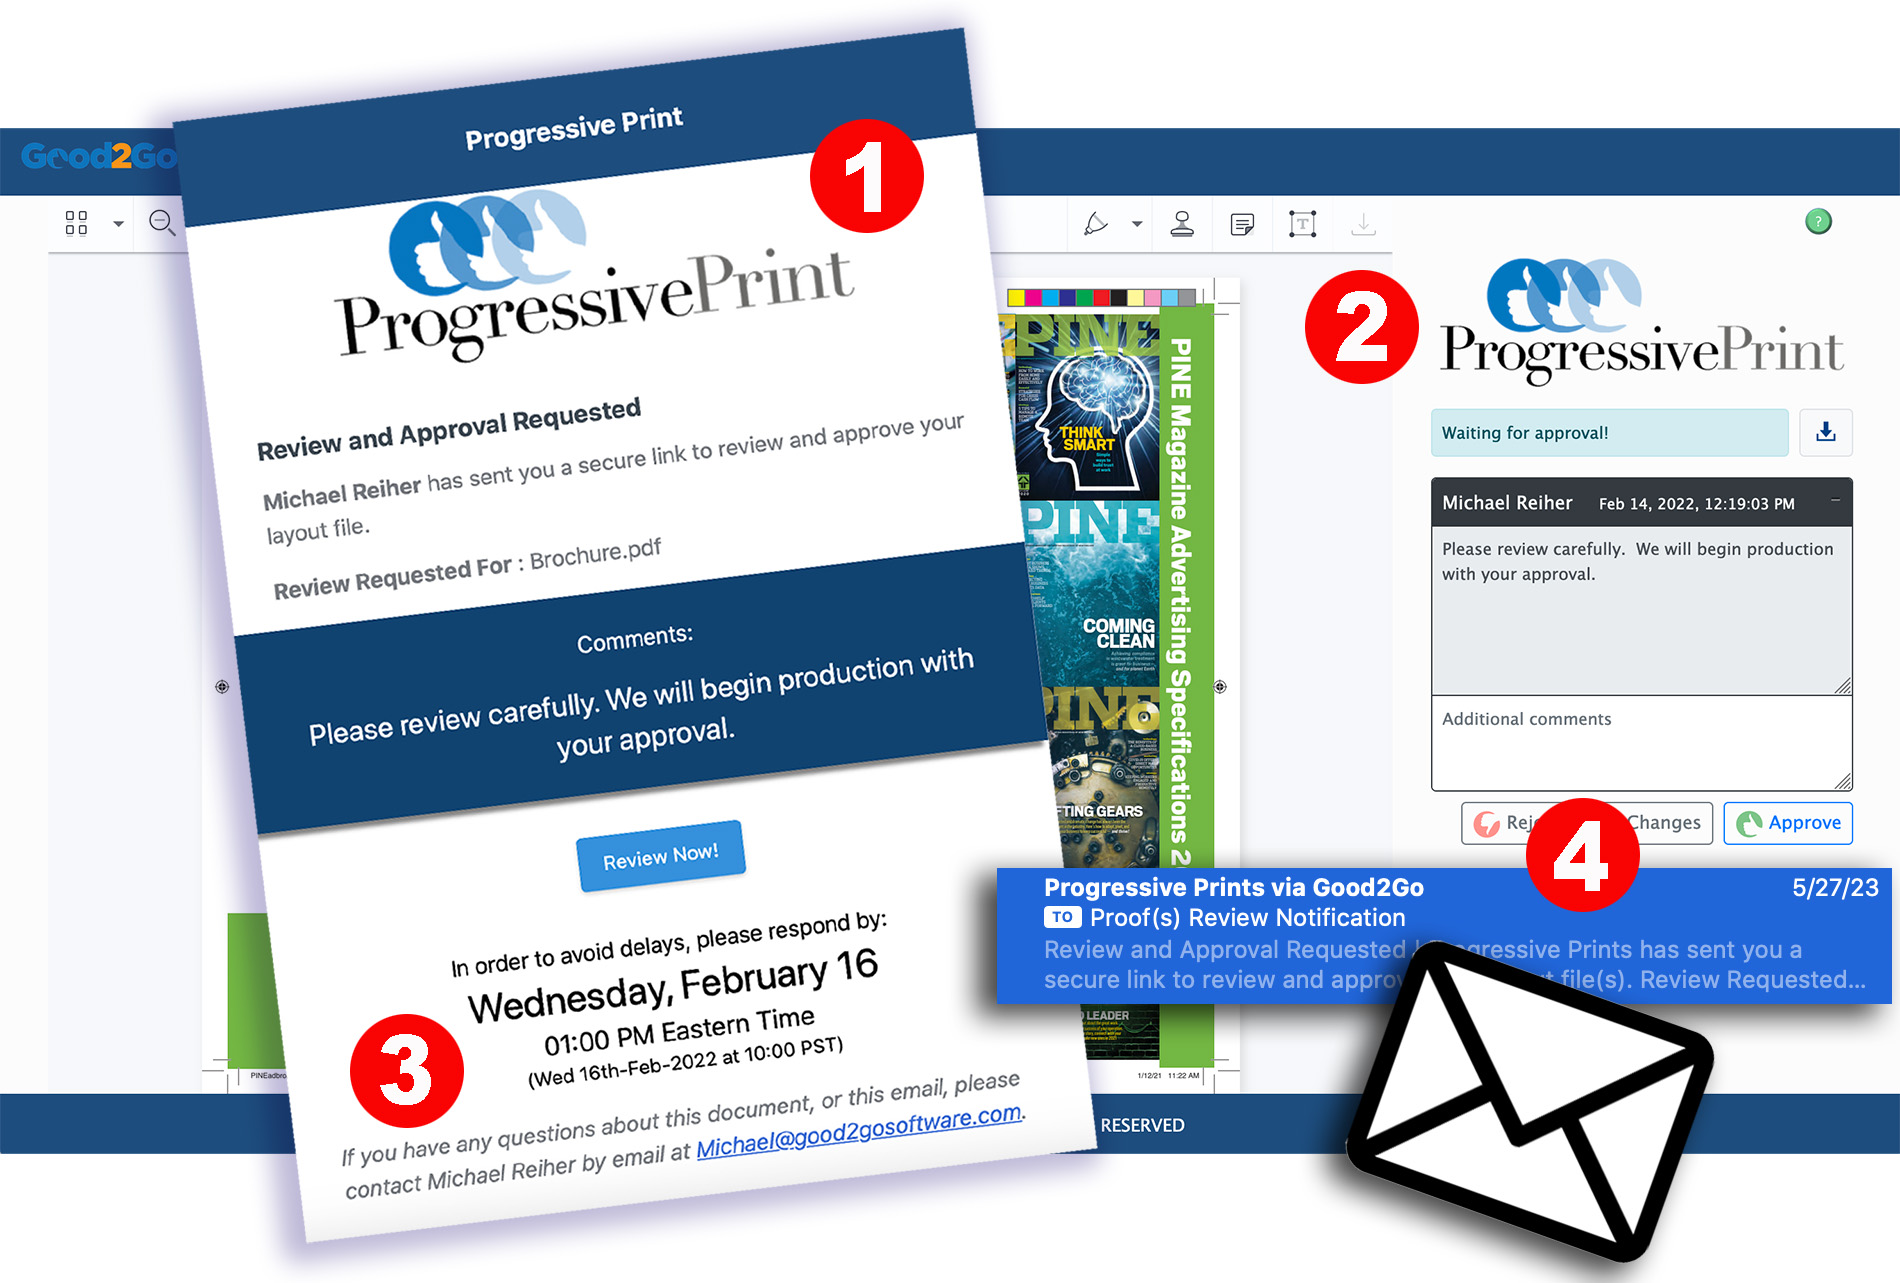
Proof Results Notification emails
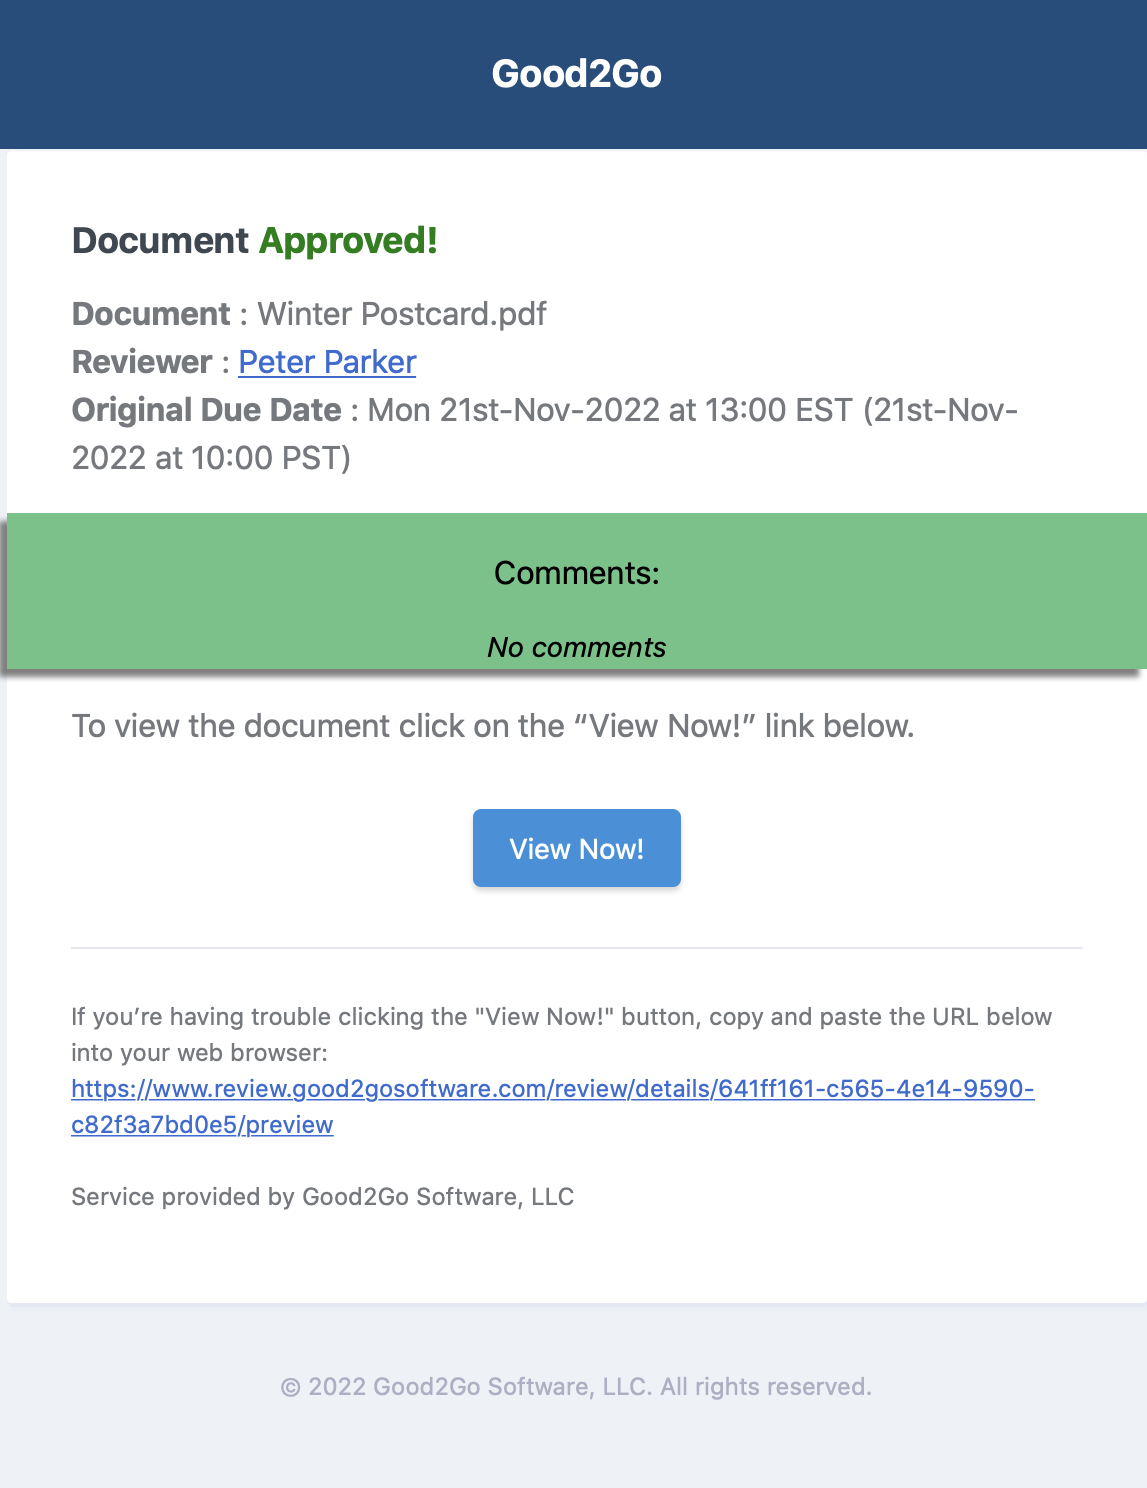
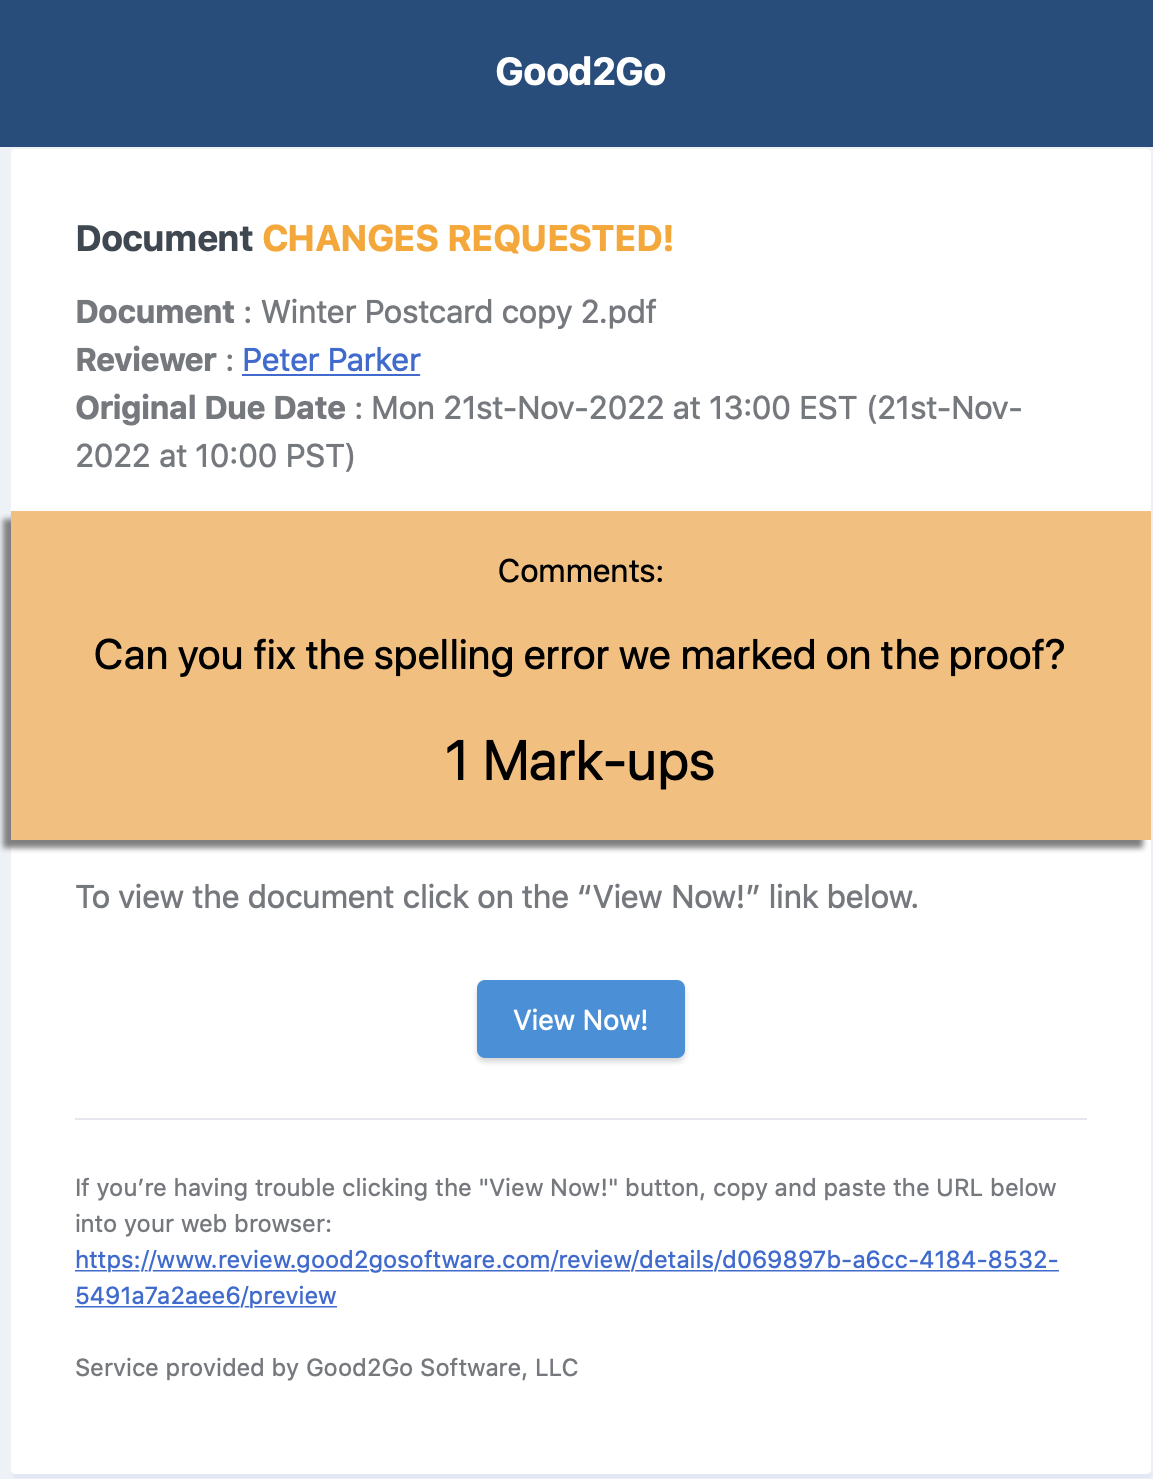
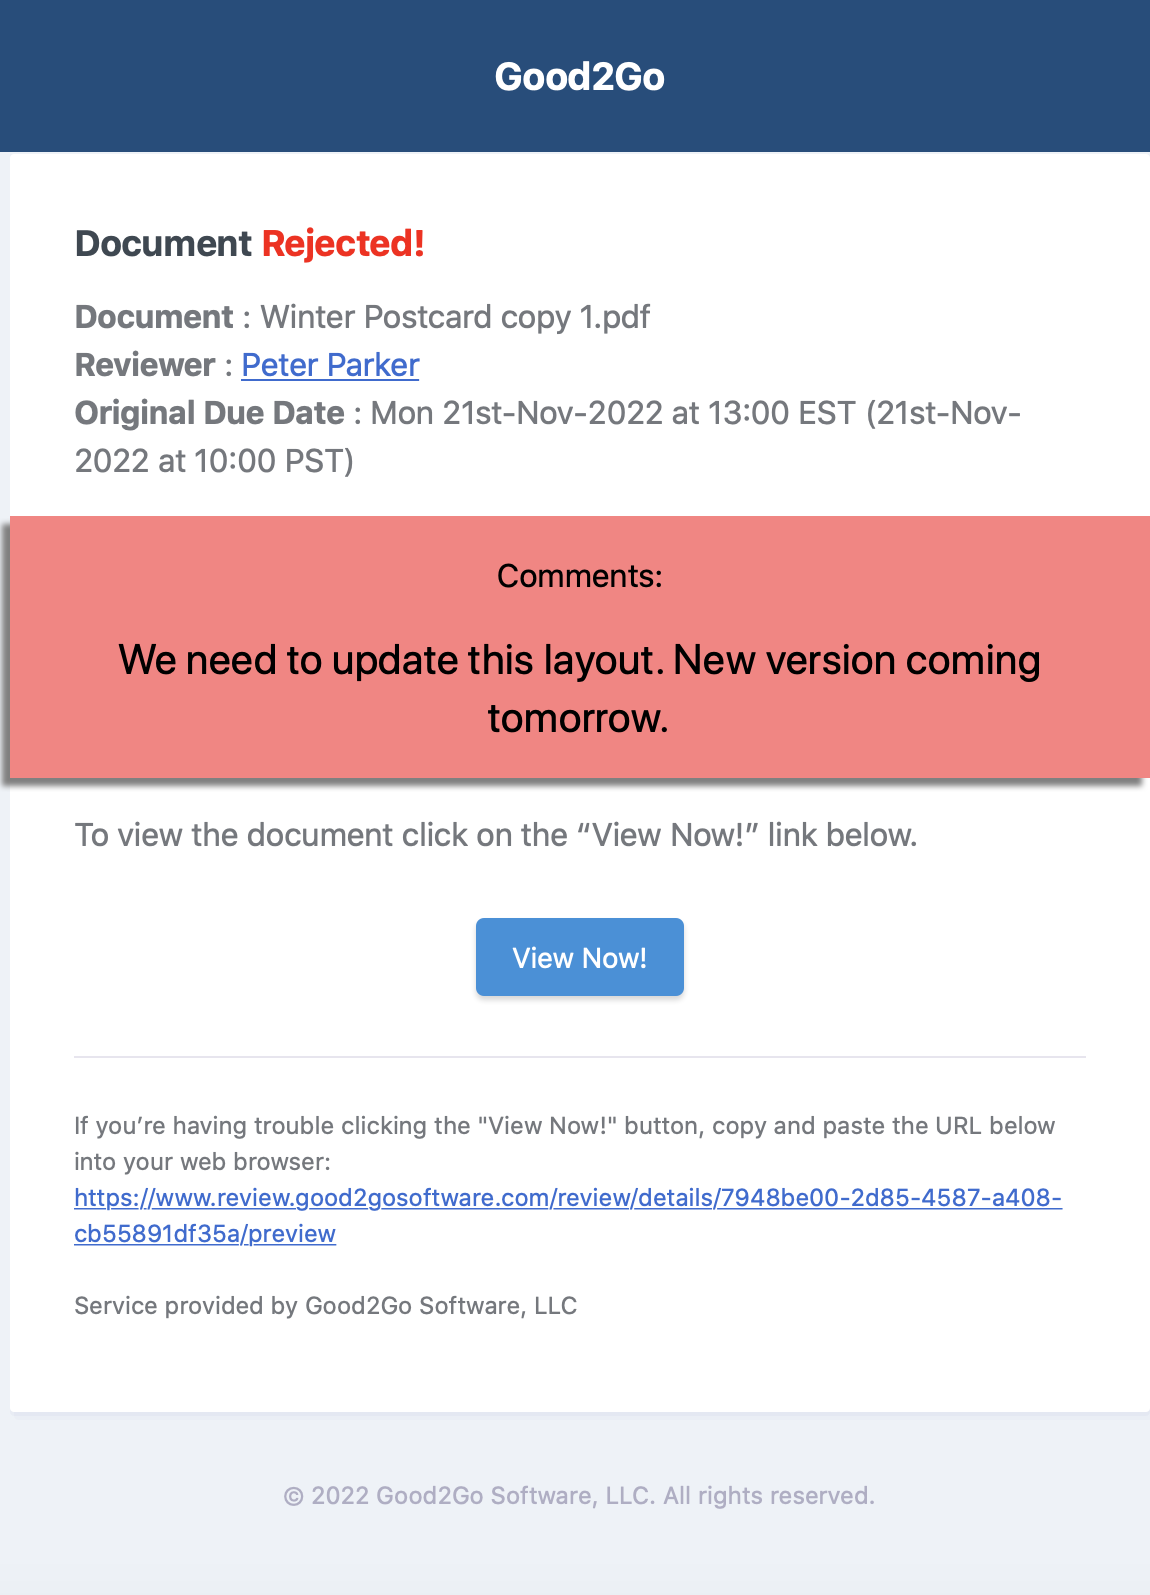
Above are examples of the three proofing result notification emails. Note the email includes any comments and notes any mark-ups the client may have made. Clicking the “Review Now” button takes the receiver right to the file in Good2Go.
Tracking your proofing results.
In addition to email notifications when a file is reviewed, Good2Go provides several places and ways to see all the reviews, the status and the results.
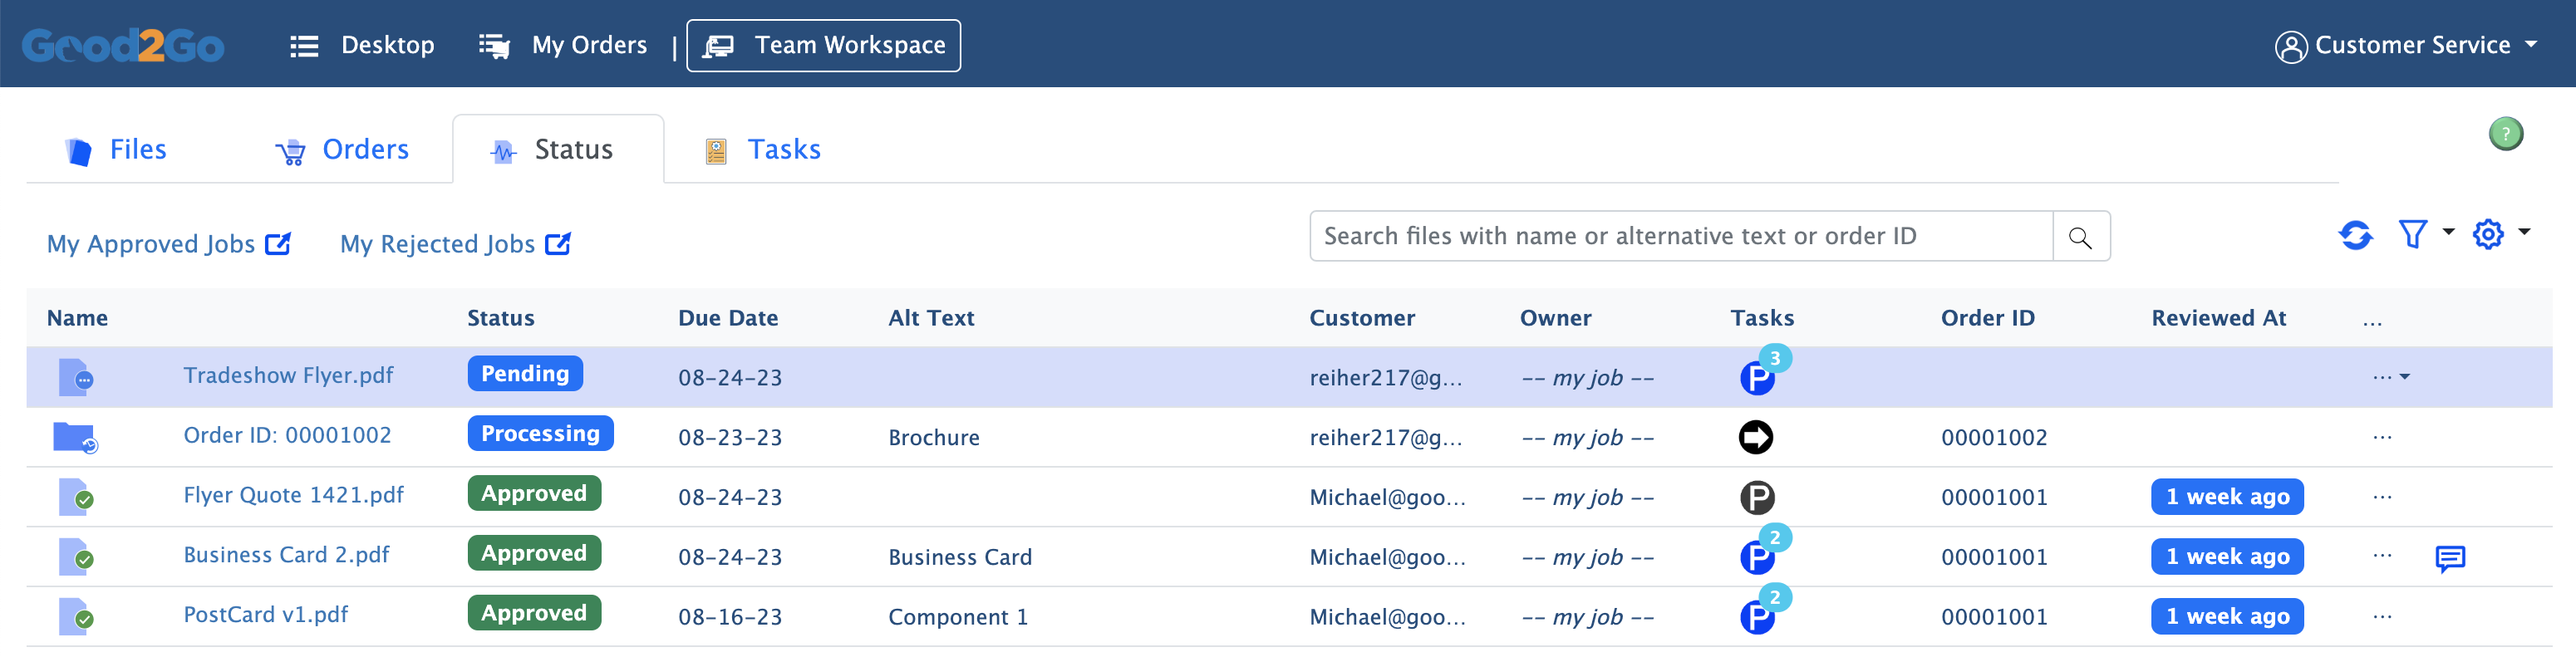
The above Team Workspace shows files and orders based on when they were last changed. This is a great place too see at a glance if the client has reviewed the document and what the status is.
Live Job Boards
Any team job board can be made “live” allowing it to update automatically every few minutes. Also, you can display just folders, files, or files and folders.
Got a favorite view? Bookmark it!
Most views in Good2Go, including specific searches, you can bookmark and add to your favorites toolbar for quick access.
Adding files to Good2Go
There are two primary ways to import a file into Good2Go. One is for Good2Go users (drag and drop) and one for external customers (upload links).
Drag and drop!
Just click and drag your file onto the Good2Go interface and your file will be uploaded. If you want your file uploaded into a specific folder, be sure to open it first.
File formats supported include just about everything. PDF, EPS, PSD, IND, PPT, XLS, DOC, TIFF, JPEG, etc…
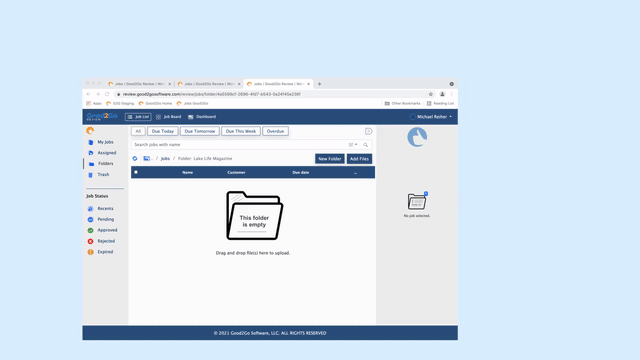
Client uploads (upload to a folder)
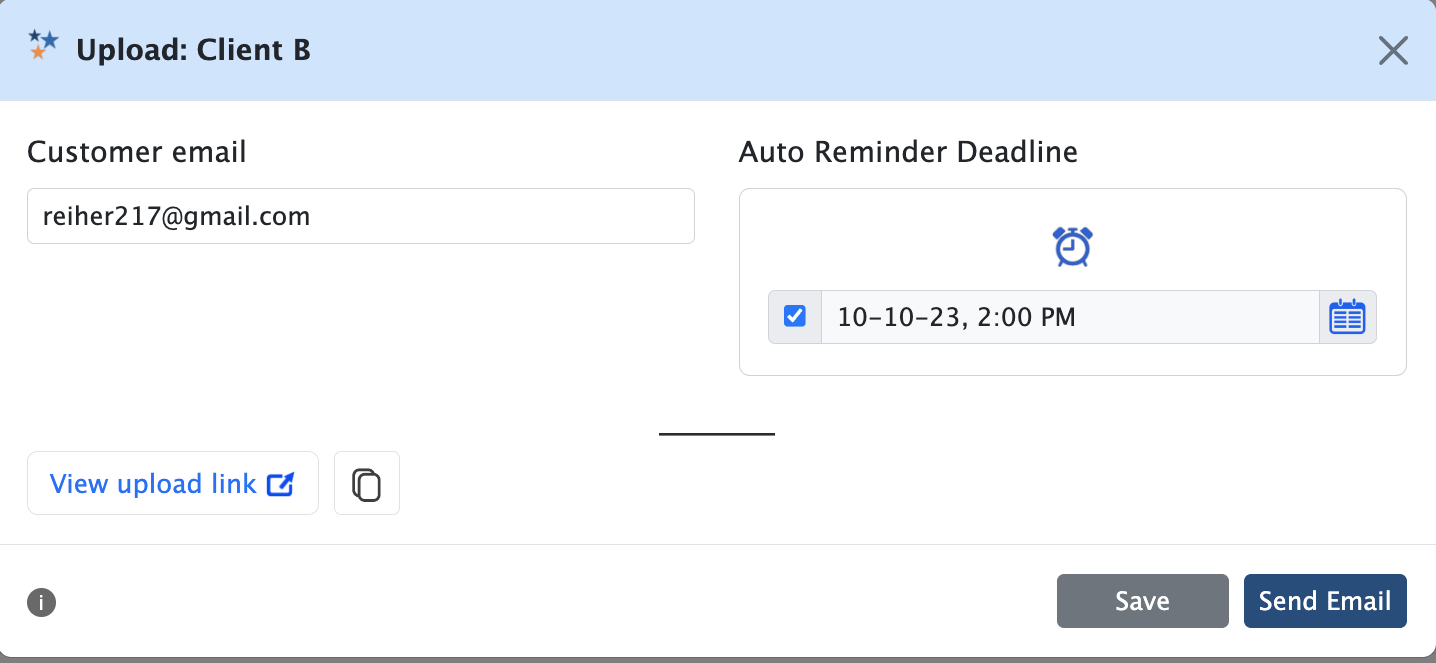
For external customers, create a folder and enter the customers name and email. Then from the folder action menu, select “Send upload link”.
You can then send the upload email right from Good2Go, or copy the link and add it to your own email. With the upload link the external customer can just drag and drop the files into Good2Go and the folder you created. Good2Go will
notify you with an email when the customer uploads a file.

Submitting a folder of files
Folders to be submitted to Good2Go should either be compressed into an archive (.ZIP) or the contents of the folder can be uploaded individually or in mass.
Note: Safari on MacOS supports automatic archiving of a folder when dragged and dropped on the Good2Go upload screen.
Order Portal
Portals provide a simple workflow for clients to submit files with job information. Portal links can be sent to clients directly, or links can be used on a web site for clients to submit an order.
A default portal is provided, but any folder can be made into a portal by selecting the “Make portal” option on the righthand information region of the Good2Go desktop.
See Section 4 for how to set up a Portal.

Good2Go provides a PDF document review and approval service with a variety of mark-up tools.
Have a question?
Don’t be shy, submit a support form and we’ll get back you as soon as we can!
PDF Preflight
The super awesome Pitstop PDF preflight in Good2Go is provided under license by Enfocus Software. PitStop Pro is the best selling, most used PDF preflight and PDF editing tool in the print service provider industry. If you’d like to learn more about what PitStop Pro can do to help you correct common PDF issues, click on the Enfocus Technology Logo to be linked to their web site.
How Preflight works
Any time you upload a PDF to Good2Go it will be run through the Preflight service provided by Enfocus Pitstop. When done, you will see the results in the file summary pane, and you can view the detailed results under the “Preflight” tab of the file details section. Along with this, Good2Go provides an annotated preflight report that allows you click on the error message and see the offending object on the page. A great way to find the source of any errors.

What’s checked in the PDF?
The preflight service looks for a large variety of possible issues in your PDF files. Those issues include: missing fonts, low resolution images, bleed settings, overprint and transparencies, ultra-small line weights, spot colors defined,
and more. The checks enabled focus on typical issues and common parameters for offset and digital printing.
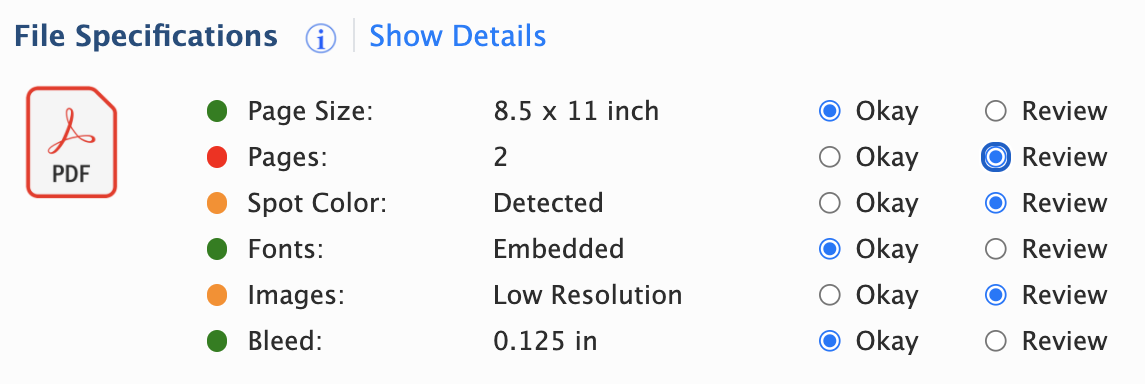
Portal preflight summary
Part of the order portal, the preflight summary provides a quick view at the most critical aspects of a PDF file for print. Page size, and number of pages are compared to the product specifications defined by the customer.
Using the Annotated Preflight Report
Downloading the report
Download from the preflight details window.
Note, there is also a JSON version for the workflow integration types.

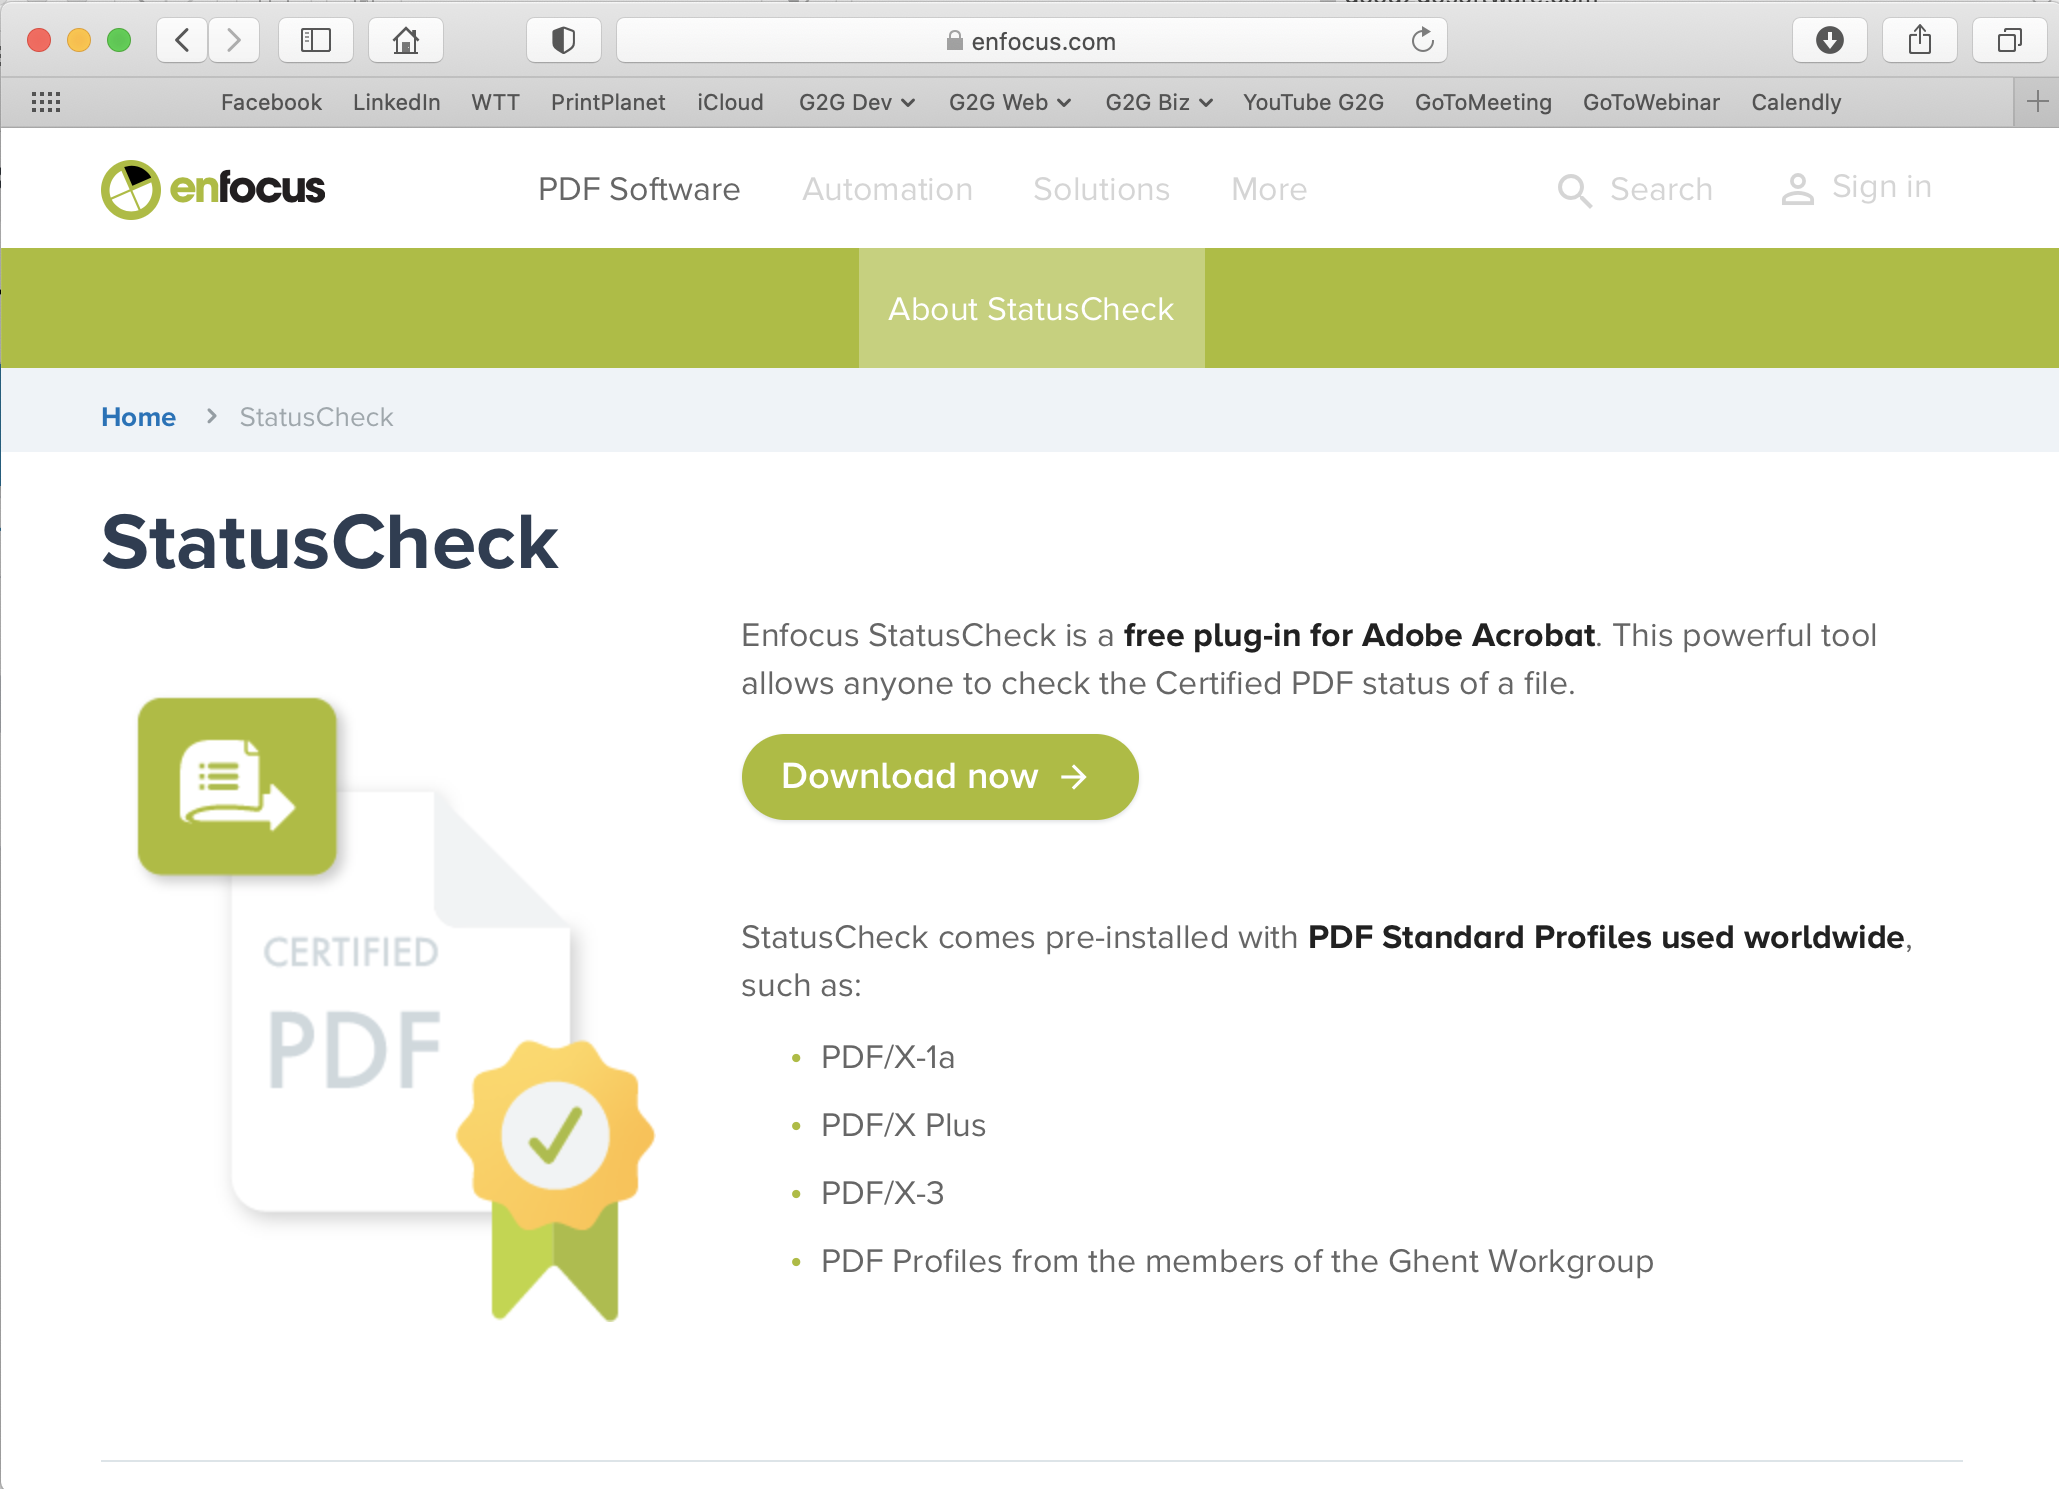
Viewing the report
To view the interactive report, you need to have PitStop Pro installed (latest version) or download Enfocus Status Check for free.
(Adobe Acrobat Required)
Reading the report
Open the PDF with Acrobat. View the list of errors and warning found in the PDF. Select an error and the object with the error will highlight on the screen. Easy-peasy!

Want to add Review & Approval to your MIS?
Visit our API page to learn more about integration opportunities with your MIS, ERP or other workflow systems.
Setting up an order Portal
Create an Order Portal

The portal icon is shown when a portal is activated.
Making an order portal is easy. First make a folder. Give it a name you’ll know what it is. With the folder selected, on the right panel turn on “Make Portal”. You will see the portal Icon appear next to the folder.
From the context menu, select “Portal Link”. This will give you the link to the portal center page (below). From there, you can navigate to a “Request a Quote” (3) or “Submit a Job” (4). These links can be independently posted on your web site or shared with customers.
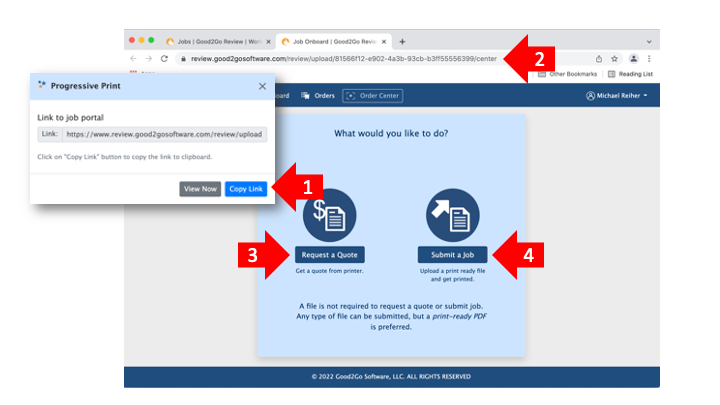
1. Portal Link dialog. 2. Center page URL. 3. “Request a Quote” link. 4. “Submit a Job” link.
Have a suggestion?
Share your ideas for features, support articles, other services to integrate with. We’d love to hear your thoughts!