Interface Roadmap
A walkthrough of the three primary screens in Good2Go
Desktop
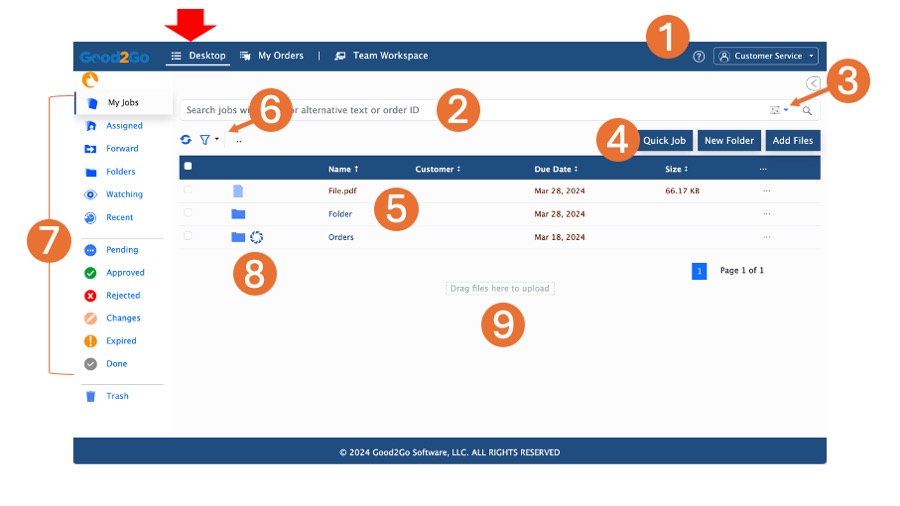
The Good2Go Desktop is where you can organize files and folders much like on the desktop of your computer. This view only shows files and folders that are yours and you are the owner. It will n ot show any team member files. This is done under the Team Workspace.

- Where you can access your Account menu, preferences and other account wide features.
- A quick search of the current view limited to job/file names, order ID or alternate text field.
- Access button to the advanced search where you can search all folders and all files in your Good2Go account.
- Quick access buttons for sending proofs, adding a new folder or adding files. Keep in mind, the “Quick Job” function will upload files into the current view or folder you’re viewing.
- Where files and folders are listed. Notice you can sort this list by name, customer, due date and size.
- A filter button to access filters to view files by their due date such as “Due today”, “Due tomorrow”, “Due this week” or “Past due”.
- Viewing filters based on the type of file/folder, or its review status. These filters apply to all files and folders in your account.
- This is your default Order Portal for your account. The round, windmill style icon indicates the portal.
- Files can be added to Good2Go by dragging and dropping files in this area. Also, individual files and folders can be moved into another folder by click, drag and drop into another folder.
Orders
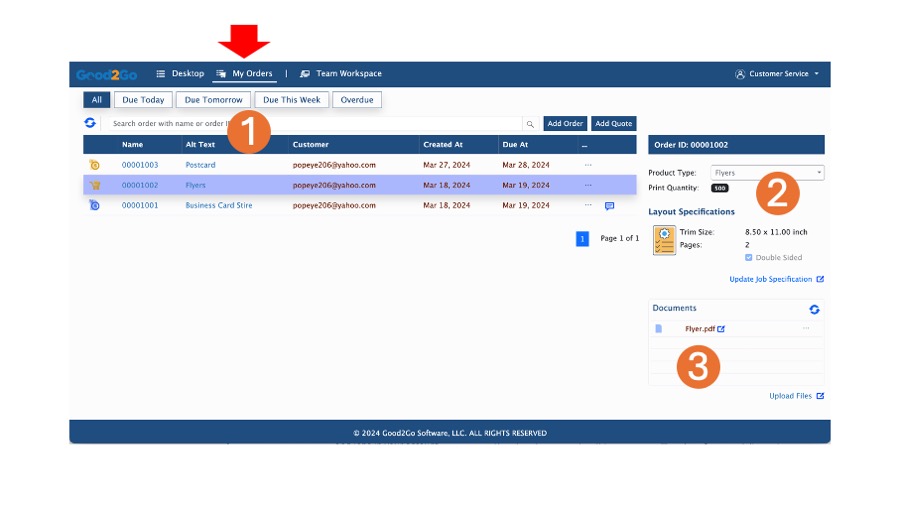
The Good2Go Orders is where you can view orders (files and specifications) uploaded to a Good2Go portal. This view only shows Orders that are yours and are associated with your account. It will not show any orders owned by team members. This is done under the Team Workspace Orders view.

- This is a list of all the orders/files uploaded from any portal activated in your account. Clicking on the order number or double clicking on the listing will open the order details. This list automatically sorts to the most recent file on the top of the list. Files marked as “Done” (under order details or on the side pane) will be removed from the list, however the order still remains for a limited time.
- When an order is highlighted/selected, the side pane shows top level details about the order.
- This shows the files that are uploaded to a selected order.
Did you know?
,Most views, even views with specific filters or search parameters, can be bookmarked in your browser for easy recall. This is good for views you use often and will save you time. Just make the view you want to bookmark and then bookmark it in your browser. Its that easy.
Team Workspaces
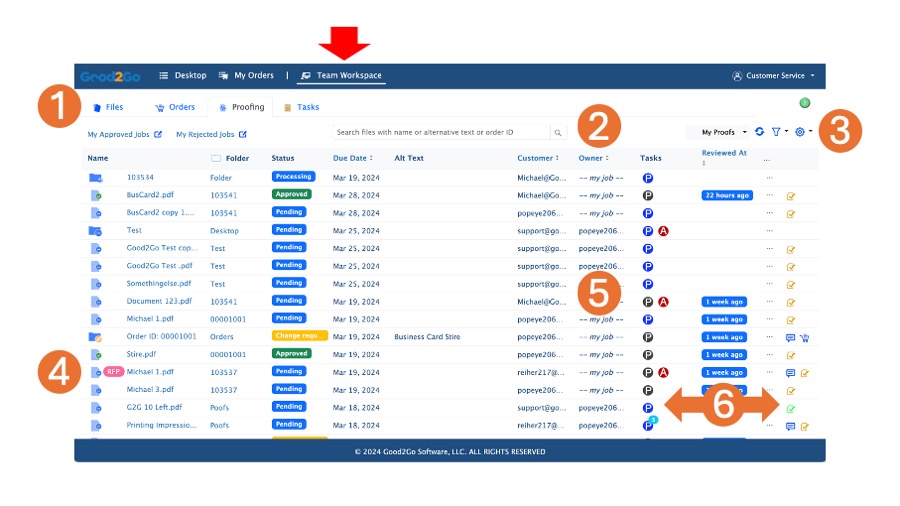
The Good2Go Team Workspace is where you can view all files by all team members in your Good2Go account. Notice there are multiple team views to help you monitor and manage different types of job and files in Good2Go.

- Here you can select the sub-views of the workspaces. Each are designed specifically for the task named.
- Notice that most columns are sortable just by clicking on the up/down arrow.
- Here you can see the filters that can be applied to each view. Note that the “My Proofs” button will expand to show all team members in your account. If you select a team member, you will see the files/jobs owned by them.
- The RFP label is where custom labels are viewed to help communicate the status of a job/file. Custom labels are defined under your account preferences.
- Under the Owner column you can see which team members owns a job
- Clicking on a task or process icon will show you a summary of that item.


